1stPayMobile Support
Running A Transaction
Transaction Types
1stPayMobile supports the following transaction types:
- Sale
- Authorization
- Voice Authorization
- Refund
The application defaults to a Sale transaction. Tap the Sale button to switch to Authorization, Voice Authorization, or Refund.
NOTE: The User's PIN determines the transaction types authorized by the account administrator. Voice Authorization is included in the "Sale" Permission.
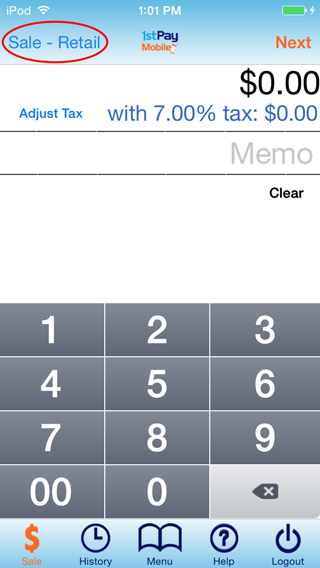
Sale Screen
The Sale Screen is the main screen of the app where all transactions are began. While this list of steps is for a sale, the only step that must be added to run an Authorization or Refund would be to tap the Sale button and switch to the desired transaction type.
- Log into the 1stPayMobile using your User PIN.
- If your account is multi-MID, select the appropriate MID.
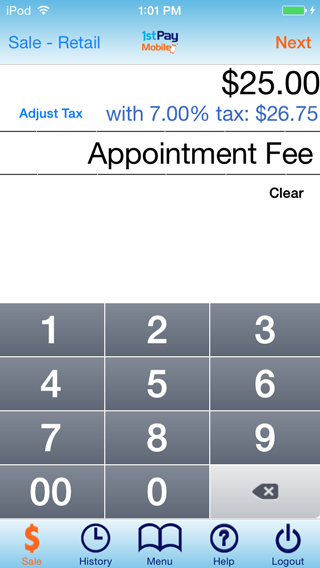
- You will be brought to the Sale Screen. Enter the amount of the sale; no decimal is necessary. For example:
- $25.00 = 2 + 5 + 00
- $10.18 = 1 + 0 + 1 + 8
- $100.00 = 1 + 00 + 00
- If desired, enter a note in the Memo Field. The Memo Field provides a place to make a note which will appear on the receipt to describe the nature of the purchase.
NOTE: The merchant account administrator may edit the "Memo" field label to fit a unique need for their business (e.g., "Description", "P.O.#", "Invoice #", "Work Order #", etc.) In the Transaction Center, Go To Main Options Mobile Settings, then edit "Memo Field Label".
- Sales Tax may be configured to automatically apply the Sales Tax Rate to the Sale amount. A $10.00 Sale with a 6% sales tax rate will automatically calculate the total sale to $10.60. You may adjust the tax rate for a transaction by tapping Adjust Tax, and entering the desired tax rate. In this dialog box, a decimal is required if the tax rate is a fraction of a precent (e.g. 7.25). Enter '0' if no tax is necessary for this transaction.
Note: You can edit sales tax settings by going to Menu Mobile Settings on your mobile device OR Main Options Mobile Settings in your Transaction Center. Read more about sales tax settings here.
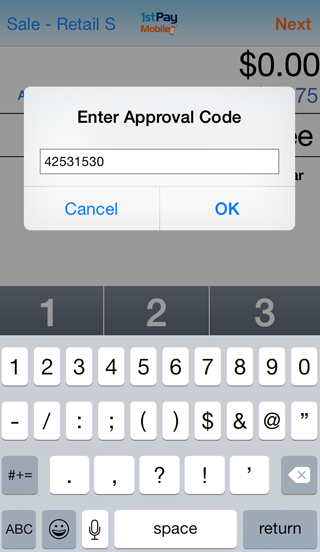
For Voice Authorizations:
If Transaction Type "Voice Authorization" is selected, the User will be prompted to enter an Approval Code, which is obtained over the phone from the Voice Authorization Center. Enter approval code and tap "Next" to proceed to the Amount screen.
For the authorization code, you must call the voice authorization center for the appropriate credit card type, and get the code from them when they approve the transaction.
- Phone number for Visa/MasterCard: (800) 228-1122
- Phone number for American Express: (800) 528-2121
- Phone number for Discover: (800) 347-1111
When you call, they will require your merchant account number (which can be found in Main Options View/Edit MID/TIDs in the MID column), the credit card number and expiration date of the card to be processed, and the purchase amount.
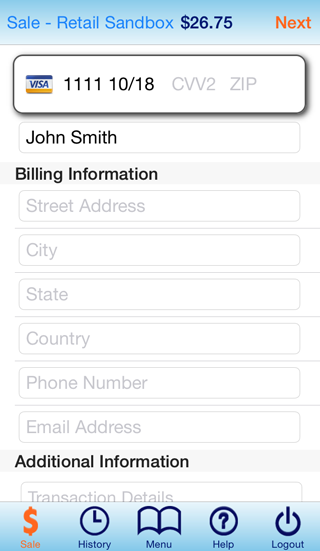
Card Entry Screen
Swipe Card
-
iOS devices: When the Card Reader is attached to the mobile device a "Swipe Now" message will be displayed briefly.
Android devices: A "Click OK to Swipe Card" message will display. Swipe the card. - Upon a successful swipe of the card, the card brand logo (e.g, Visa, MasterCard, Discover, AMEX) will be displayed with the last 4 digits of the card number and the expiration date (e.g, MMYY). A field for CVV2 and Zip Code will appear. Tap each field and fill in the information, if required or desired.
- The Name on Card will be displayed if the information is available on the mag stripe of the card. If Name on Card is not populated from the successful swipe, it may be manually entered by tapping the Name on Card text box.
- If the transaction is recurring, turn Recurring Billing on by tapping the toggle switch. Then select the frequency from the dropdown menu and tap Done.
- The account administrator may require additional fields to be displayed including Optional Cardholder Information and/or custom Additional Fields to capture customer data unique to the needs of the merchant's business. See the Transaction Center configuration in: Main Options Mobile Settings Optional Cardholder Information and, Main Options Additional Fields
- When all required information is entered, tap 'Next'. The Next button navigates to the Signature screen where the cardholder's signature is collected and the transaction is submitted.
Manual Card Entry (Keyed Transactions)
A manual card entry may be required, if the mag stripe on the card is defective, when the card reader is not attached, or for orders taken over the phone (Card Not Present). Contact your merchant account provider for more information on Card Not Present transactions.
- Tap the box with the placeholder credit card number 1234-5678-9012-3456. Key in the credit card number and expiration date. Zip Code and CVV are optional and may be entered if desired, or required by administrator. Tap 'Done'.
NOTE: CVV2 is the three digit security code located on the back of Visa, MasterCard & Discover cards, and the 4 digit code found on the front of American Express cards.
- In the box below, enter the Name on Card.
- If the transaction is recurring, turn Recurring Billing on by tapping the toggle switch. Then select the frequency from the dropdown menu and tap Done.
- The account administrator may require additional fields to be displayed including Optional Cardholder Information and/or custom Additional Fields to capture customer data unique to the needs of the merchant's business. See the Transaction Center configuration in: Main Options Mobile Settings Optional Cardholder Information and, Main Options Additional Fields
- When all required information is entered, tap 'Next'.
- A popup box will prompt you to choose one of the following:
- Signature: Proceed to the signature screen for collection of the signature.
- Submit: Submit the transaction for processing. This takes you to the Transaction Result screen.
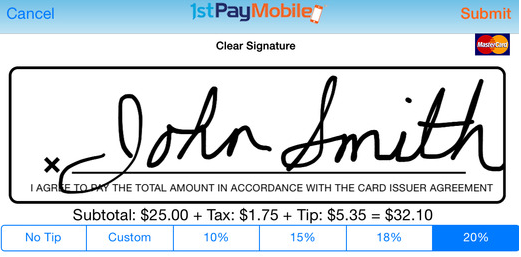
Signature Screen
The Customer's Signature is required for Swiped Transactions. The Customer's Signature is optional for Keyed Transactions. See 'Manual Card Entry' section for more information.
- Have the customer sign in the signature box. They can use their finger to sign, no stylus is required.
- If they'd like to re-do their signature, tap the 'Clear Signature' button.
- If Tip is enabled, the customer can choose whether to add a tip to the transaction, and the amount. Custom can be used to enter a custom tip, or they may select a percentage of the transaction total.
Note: You can edit tip settings by going to Menu Mobile Settings on your mobile device OR Main Options Mobile Settings in your Transaction Center. More about tip settings can be read here.
- When finished, tap 'Submit' to submit the transaction for processing.
The 'Cancel' button will allow you to abandon the transaction after you confirm the cancellation.
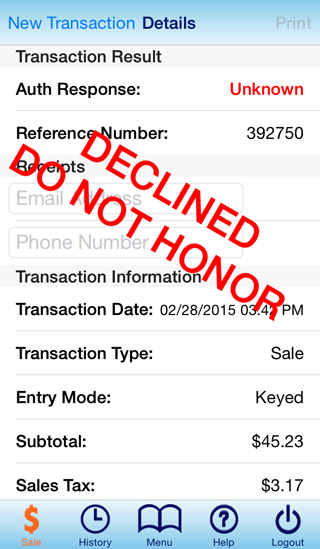
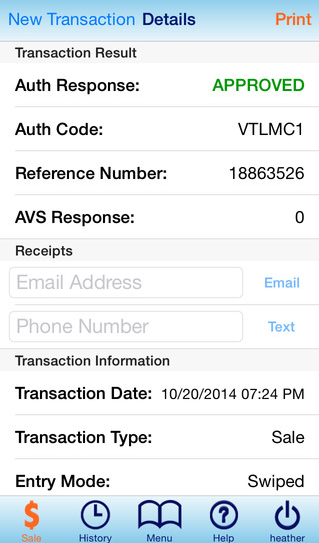
Transaction Result Screen
An "Approved" response will display in green. A "Declined" response will display in red.
Receipts
- To print a hard copy of the receipt with your Star Receipt Printer, tap the 'Print' button in the upper right corner.
- Email and Text buttons offer the option to email or text a receipt to the customer. If email address or phone number is entered during the transaction, these fields will be populated with that information. If they are not filled in, you may manually enter them at this time, and then tap Email or Text.
Note: To automatically send receipts to your customers, go to Menu Mobile Settings OR Main Options Mobile Settings in your Transaction Center. You must also enable 'Optional Cardholder Information' in Main Options Mobile Settings in your Transaction Center. Read more about mobile settings here.
Tap 'New Transaction' in upper left corner or 'Sale' button in footer menu to start a new transaction.
Approved Transaction:
Declined Transaction: