Payment Page Builder Support
Custom Fields
Creating Custom Fields
Adding Custom Fields
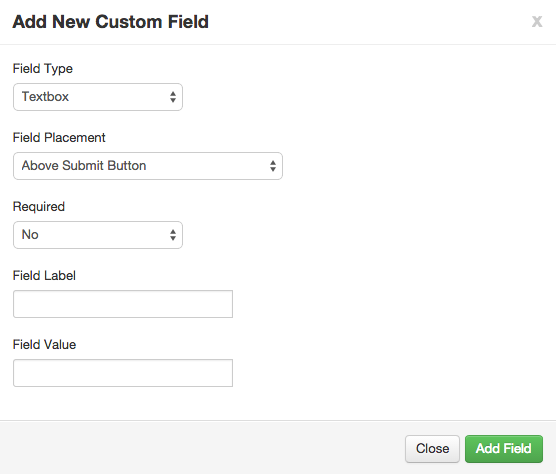
Custom fields can be added as you wish. To set custom fields up:
- Click Add New Field. A popup box will appear.
- Select the type, label, value and requirement of the field.
- The field type allows a selection to be made for a textbox, text area, checkbox or a pull-down menu.
- The Field Placement option allows you to determine where this field should go on your page. The options are as follows:
- Above Submit button
- Top of the Amount/Frequency Section
- Bottom of the Amount/Frequency Section
- Top of the Billing Information Section
- Bottom of the Billing Information Section
- Top of the Payment Information Section
- Bottom of the Payment Information Section
- Above Submit Button
- Under Required, select Yes if you'd like it to be required, and No if you do not want it to be a required field.
- Set the Field Label as the label for your field
- The Field Value is the value that you would like to be reflected
- Click Save to save changes
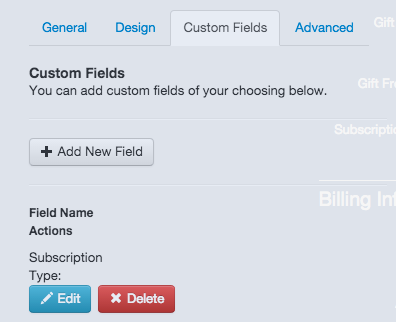
Editing and Deleting Custom Fields
To edit or delete a custom field, you will need to click Edit or Delete. next to the field name under the section labeled Field Name Actions. If you select Edit, a popup window will appear with all configurable options. Clicking Delete will remove it from the page.
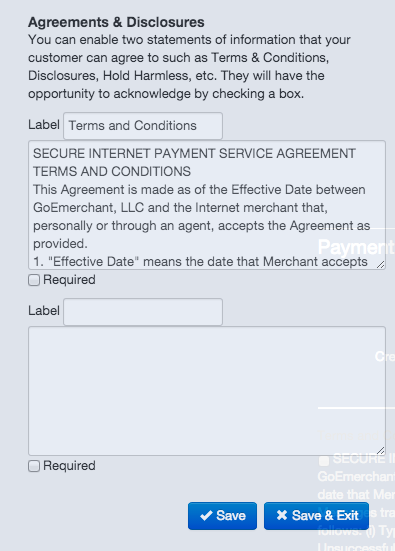
Agreements & Disclosures
You have the ability to add up to 2 statements of information that your customers can agree to such as Terms & Conditions, Disclosures, etc. They will have the opportunity to acknowledge by checking a box. To set one up:
- In the Agreements & Disclosures section, enter a name for your agreement or disclosure in the Label section.
- In the large textbox, enter the Agreement.
- If it is required that your customers agree to this, check the box that says Required.
- Click Save or Save & Exit to save your changes.
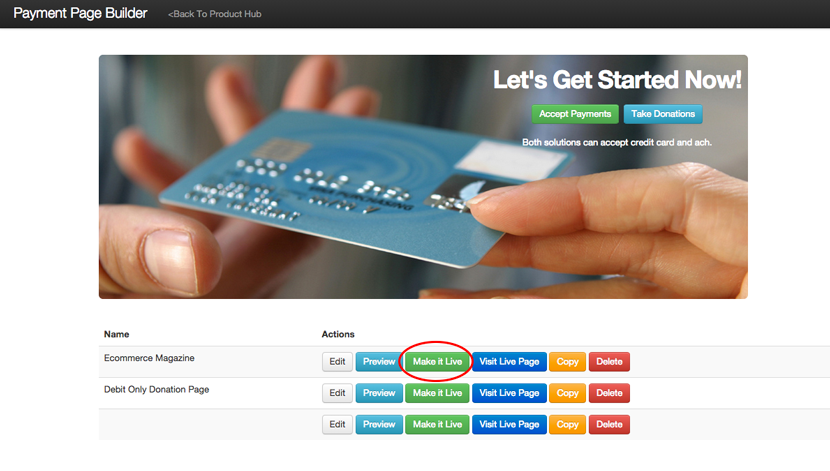
Making Your Page Live
When you are finished making changes, you must manually put your page live so that your changes are visible to the public. To do so:
- Click Save & Exit at the bottom of your Payment Page editor. You may also click Go Back in the top navigation.
- You will see all of your payment pages listed below the banner image. Next to the one you'd like to make live, click Make it Live.
- Your changes are now live! You may click Visit Live Page to see the live page.
- You may continue editing your page at any time.