Payment Page Builder Support
Configuring Single Page Checkout
For every Payment Page you have created, you have the option of setting the page style to be single page, 2 page, or 3 page checkout. If you want additional control over transactions being processed through your Payment Page, you can use single page checkout to intercept the results of a processed transaction.
Step 1: Setting Page Style
- Login to your Transaction Center
- Select Payment Page Builder in the Product Hub
- Find the desired Payment Page in the list and click Edit
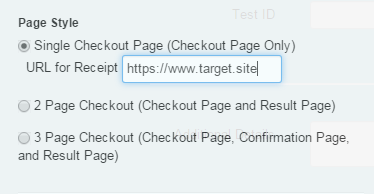
- In the builder under the General Options tab, scroll down to the Page Style section and select Single Checkout Page
- Enter the URL desired to send the response data.
- Click Save and Exit to close the builder.
- Next to the one you'd like to make live, click Make it Live to apply the changes to the live page.
Step 2: Set Up Receipt Page
The URL for Receipt must be configured by you or your developer to accept the parameters that are sent to it. The parameters will be sent in the following format:
http://[MERCHANT_DEFINED_URL]?status={True/False}&auth_code={number}&auth_response={string}&avs_code={string}&cvv2_code={string}&order_id={string}&reference_number={number}&amount={money}&storename={string}&processor={string}&mid={string}&tid={string}
You will likely want to try a few test transactions to ensure that your page is able to accept all the parameters correctly. For more information on running test transactions see our Sandbox guide here: https://secure.1stpaygateway.net/secure/transcenter/help/1stpaygateway_sandbox_supplemental_guide.pdf