Shopping Cart Support
CRM (Customer Relationship Management)
There is a CRM (Customer Relationship Management) built into each Premium Cart Store that can be enabled and use to track correspondence with customers. Customers can also contact you through a form on your store, which will be recorded in the CRM.
Step 1: Enable CRM
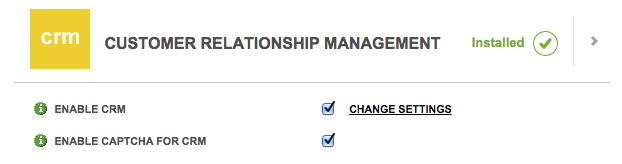
To enable the CRM feature, you must:
- Log into your 3dcart Online Store Manager
- Go to Settings General Store Modules
- Click the Customer Relationship Management (CRM) section heading to expand the contents.
- Click the checkbox next to 'Enable CRM'.
- If you'd like users to be required to enter a captcha code to submit a contact form, click the box next to 'Enable Captcha for CRM'. This is useful if you'd like to prevent web robots from spamming your CRM.
- Click Save Changes.
Step 2: Configure CRM Settings
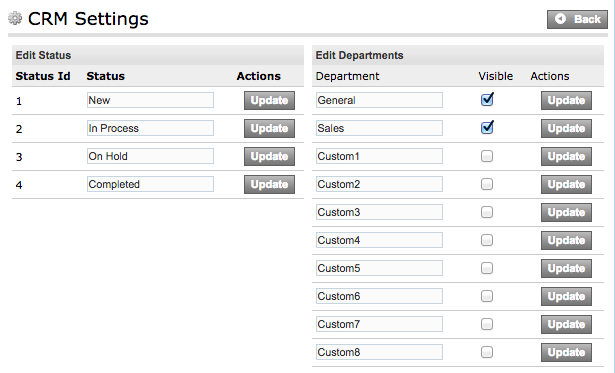
The CRM's statuses and departments are customizable. To edit these settings, you must:
- Log into your 3dcart Online Store Manager
- Go to Settings General Store Modules
- Click on the Customer Relationship Management (CRM) section heading to expand the contents.
- Click Change Settings.
- If you'd like to change the name of the a Ticket status, edit it in the Status field.
- Click Update next to the edited Status field.
- Repeat for each status field you would like to edit.
- You also have the ability to edit the departments available for the customer to choose from to send their tickets to. Edit the Department you'd like to change in the Department field.
- Click Update next to the edited Department field.
- Check the Visible checkbox next to the departments you would like displayed to the customer.
- Click Update.
Customer-Created Ticket
The CRM tickets can be created by you or your customers. Customers can submit tickets through your store's Contact Us page, or from their customer account page. Please note that if customers submit the ticket from the Contact Us page, it won't always be automatically linked to their customer record, since they may not be logged in when they submit the ticket.
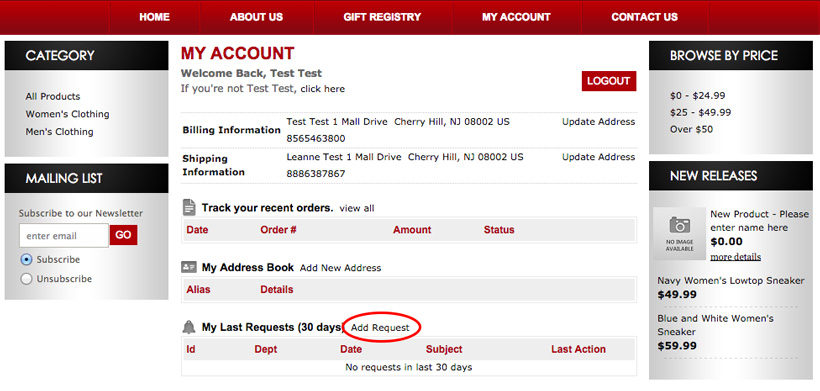
To Submit a Ticket from Customer's My Account Page:
- From your online store, the customer must click My Account and log in.
- Once logged in, click Add Request in the My Last Requests section.
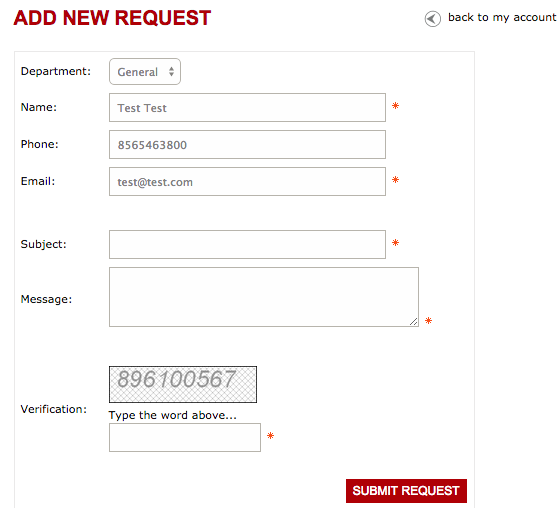
- Fill in the CRM form. Your customer must select which department they'd like to send the request to with name, phone number, email address, and message.
- Click Submit Request.
- After the customer submits a ticket, you (as the merchant) will receive notification via email that a CRM ticket has been submitted with a summary of details.
NOTE: The email notification is merely a notice of the ticket, and does not contain the full specifics of the ticket, such as submitter's contact information. To respond to the ticket, you will need to view it from your Store Manager.
- The ticket will automatically be assigned an ID, and the customer can log into the 'My Account' section at any time to view the status of the ticket.
Merchant-Created Ticket
To Submit a Ticket from the Merchant's Store Manager:
- From your Store Manager, go to Customers View/Edit and locate the customer you'd like to create a ticket for.
- Click Edit next to the customer you'd like to create a CRM ticket for.
- Click Actions
- Select Open CRM Ticket
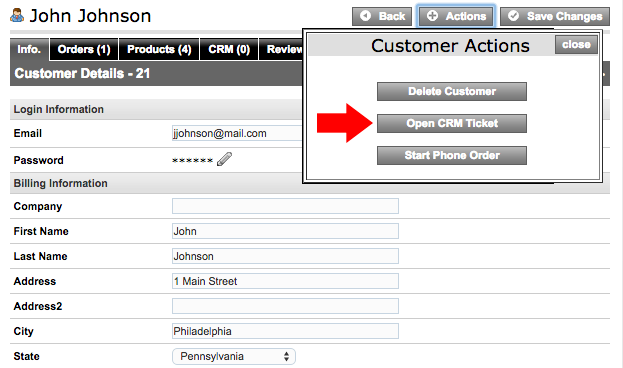
- The ticket will automatically fill in information from the customer record, but you can change any fields that are necessary.
- Enter a subject for the ticket in the Subject field.
- In the message text area, type your message.
- Leave the Email Customer box checked if you would like the customer to receive an email notification of the ticket.
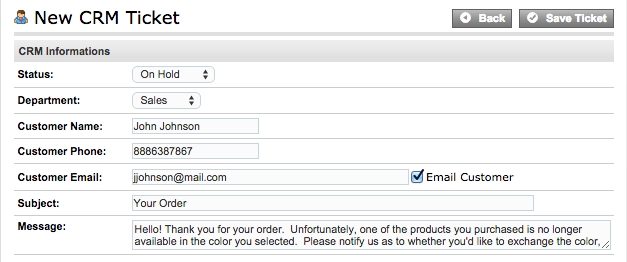
- Click Save Ticket.
NOTE: You may also create a CRM ticket while viewing an order by clicking on the Order's "Actions" button and selecting "New CRM" from there. By going through the order, the ticket will automatically enter the order number along with the customer record.
- The ticket can now be managed from the Customers CRM section. The customer can also log into the 'My Account' section of your internet store to view the ticket.
Step 3: Viewing and Responding to CRM Tickets
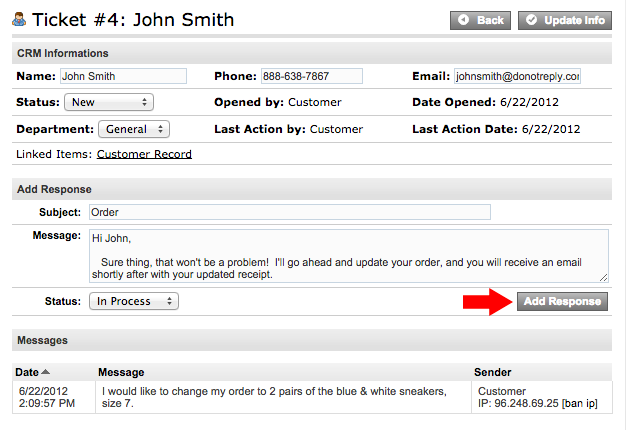
- From your Store Manager, go to Customers CRM.
- Click Open next to the ticket you'd like to view.
NOTE: While viewing tickets, some may be highlighted in yellow, and some in white. Yellow means that the CRM ticket is awaiting your response, and white means that you are waiting for a response from the customer.
- In the Messages Section, customer requests will appear. Type your response in the Message field under the Add Response section.
- You may change the Status of the ticket if needed.
- When finished editing your response, click Add Response.
- The customer will receive an email with your response. The email that is sent can be configured in Settings Design Emails. The email is titled "CRM - Reply".
Step 4: Closing CRM Tickets
Once the issue in your CRM ticket has been resolved, you can assign a Closed status to it. To do so:
- Log into your Store Manager.
- Go to Customers CRM.
- Click Open next to the ticket you'd like to edit.
- Type any desired messages to the customer in the Add Response section.
- Change the Status to Completed.
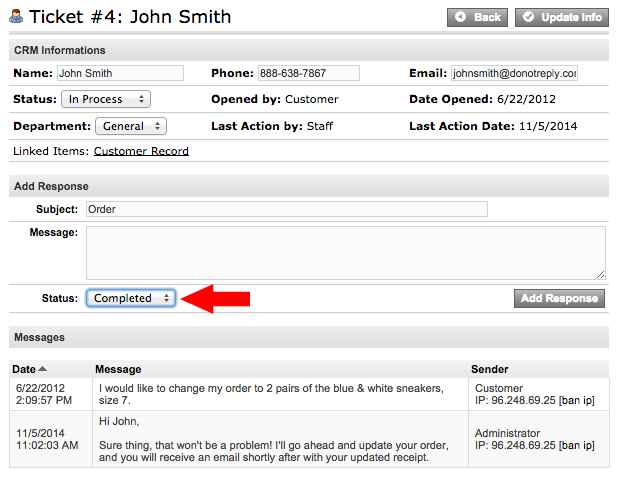
- Click Add Response if you typed a final message to the customer, or Update Info if you would only like to change the status, and do not wish to add a response. The customer will receive an email of the response, and can also log into the My Account section to see the ticket status and history.