Shopping Cart Support
Manage Orders
Once an order has been placed by a customer on your shopping cart website, you have many options in regards to processing the order and customer information. This guide will review all options for order management.
View a New Order
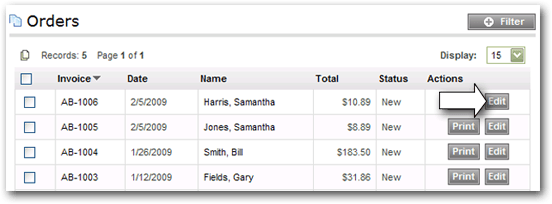
To view a new order:
- Go to Orders New
- Click Edit next to the order you would like to view.
- You can review the customer Billing and Shipping information. Click Edit if you need to change the information.
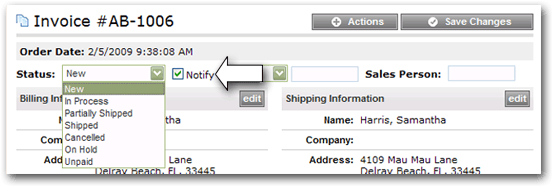
- You can view the status of the order in the Status field. You can move the order status from this section as well, i.e. move from New to Shipped.You can choose to notify the customer of status change, via email, if you check the Notify Customer checkbox.
- You can view the shipping method, ship date (if it has been shipped), tracking order number (if it has been shipped), and the weight of the order.
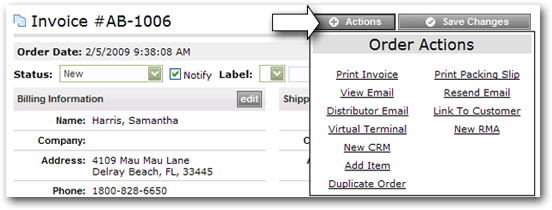
- By clicking the Actions button at the top, you can view the email that was sent to the customer by clicking on the View Email link. You can also choose to resend the email by clicking the Resend Email link. Additionally, from this section, you can Add a New Item to the order, create a CRM ticket, create an RMA, or use the Virtual Terminal.
- At the bottom of the order, you can view the payment details in the Payment Information section. If you have any checkout questions, the answers to them will be located in the Checkout Questions section. Additionally, you can see referral information for the customer in the Customer Visits Details section.
Change Order Status
After an order has been placed by a customer, you may want to move it to different stages as you process it. For example, you may choose to move the order from New to Shipped once the products have been shipped to the customer. You can choose to move 1 order to a different status, or multiple orders at the same time to a different status.
- Go to Orders New (or the Name of the status the order is in, i.e. In Process, Partially Shipped, etc.)
- Click Edit next to the order you would like to change the status of.
- In the Status section, change the status of the order in the dropdown box to the desired status.
- Check the Notify Customer checkbox if you want to notify the customer via email of the status change.
- Click Save Changes.
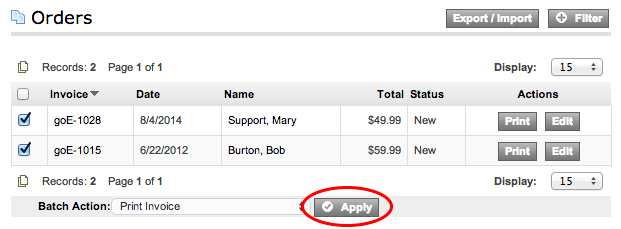
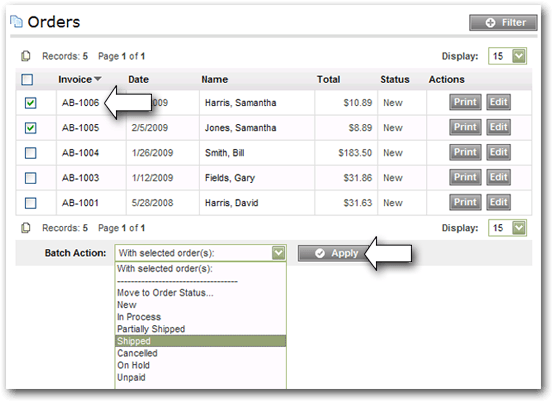
Move Multiple Orders to Another Status Simultaneously:
- Go to Orders New (or the Name of the Stage the orders are in, i.e. In Process, Partially Shipped, etc.)
- Check the checkboxes next to the orders you would like to move.
- Choose the Status to which you'd like to assign the orders in the Batch Action dropdown.
- Click Apply.
Automatically Send Email Upon Order Status Change
If you would like to automatically send an email to the customer when the status of an order changes:
- Go to Settings General Store Settings
- Scroll down to the Email Options section.
- Check the checkbox next to each order status for which you would like to automatically send an email to the customer.
- Click Save Changes.
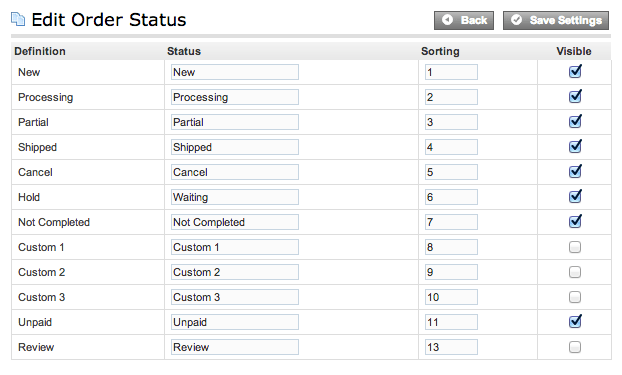
Edit Order Status Name
GoEmerchant has created order status names for you, i.e. New Order, Shipped, On Hold, etc. You have the ability to change the status names to anything you'd like. For instance, On Hold may be called Waiting at your comopany. You are also able to add and hide any order status.
- Go to Settings General Store Settings
- Scroll down to the "Orders Settings" section where you will see a link labeled "Edit Order Status." Clicking on this link will take you to a new page where the order status settings can be altered.

- Edit the name in the Status field to change the name of the Status.
- Click Save Changes.
- You can also choose to add a new Status by editing one of the Custom Status fields.
- Make sure to check the Visible checkbox so you can see your new Status.
- Click Update.
Note: After you change the name of a current Status to something else, the corresponding automatic email for the original status will still send out. You can either edit the email template in Settings Design Emails, or choose to eliminate the automatic email in Settings General Store Settings.
Uncompleted Orders
Finish a Not Completed Order
If you are able to contact a customer and they would like to complete an order after they have abandoned the checkout process, you can complete the order for them.
- Go to Orders Not Completed
- Click View next to the order you would like to complete.
- Click "Open Order" in the Order Link section.
- You will be brought to the customer's cart. Complete the unfinished order.
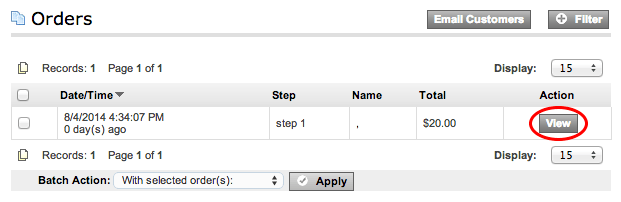
Email Customers with Not Completed Orders
To email customers that have abandoned the checkout process (the customer must have already input their email address for this to work):
- Go to Orders Not Completed
- Click View next to the order of the customer you would like to email.
- Click on the Send Email button. You can click the Preview Email button if you would like to look at the email before you send it.
Add and View Tracking Codes
Once you have shipped an order, you can add the tracking code for reference. When you move an order to the Shipped status with the tracking code input, it will be emailed to the customer if they receive email notifications for the Shipped status.
- Go to Orders New
- Click Edit next to the order to which you'd like to add the tracking code.
- Type in the Tracking number in the Tracking field.
- Click Save Changes.
- To view tracking information, you may click on the '?' next to the tracking code at any time.
Print Invoices and Packing Slips
You can choose to print either one or multiple orders or packing slips at a time.
- Go to Orders New (or the Name of the Stage your orders are in, i.e. In Process, Partially Shipped, etc.)
- Check the checkboxes next to the orders you would like to print.
- Choose Print Invoice or Print Packing Slip in the Batch Action dropdown.
- Click Apply.