Shopping Cart Support
Product Options
Adding Product Options
Some of your products may have multiple options. For instance, if you sell clothes in your online store, a sweater may come in small, medium, and large. Alternatively, you may have a product that has multiple colors for a choice. This article will show you how to set up multiple options for your products and customizations you can make.
Create Product Options
- Go to Products View/Edit
- Click Edit next to the Item to which you'd like to add options
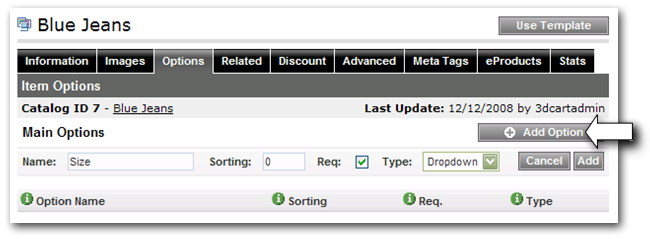
- Click on the Options Tab
- Click the Add Option button and type in your Option Name, i.e. Size
- Type in the Sorting number - this is used to control how your options display if you have more than one for the same product. Lower numbers will display before higher numbers.
- Check the Req. checkbox if you would like this option required to be chosen by the customer to be able to add the product to the shopping cart.
- Choose the way you would like the option to be displayed in the Type field, then click Add
There are multiple option types that you can select from. Below is an explanation of each:
- Dropdown: Lists your options in a drop down menu format. Only one option may be chosen at a time.
- Radio: Lists your options in Radio button fashion. Again, only one option may be selected at one time.
- Check Box: Lists the options in checkbox fashion. However, multiple options can be checked at once.
- Title: Simply displays a title line in your option fields. This is not really a selectable option, per se. Instead it is intended to be used as a divider between option sets if you choose to use it.
- Text: Allows your customer to input some simple text as part of the option. An example where this may be used is in a case where the option selected is a monogram. This field will allow your customer to specify the lettering.
- Text Area: Similar to the text option display except that this allows for a larger amount of text. This can be useful when giving your customer the option of creating a personalized message to be added to the order. For example, an embroidered motto or an engraved message.
- Drop Image: When this option type is selected, you are able to assign a picture of the option to your customers. An example of how this would be used is when a color option is used - you can use an image of your product in each of the available colors.
- File: This allows you to include a field where your customer can upload a file to be used on a particular option. For example, an image file or logo that needs to be added to the product in the case of business cards.
- Quantity: This allows you to add a quantity field to the product's options. The quantity will display on the view cart page when your customer adds the item to their cart.
- One Time Fee: This option type allows you to specify an additional fee to the product whenever necessary. For example, a set up fee or other one time charge that gets appended to the order.
Add Option Set
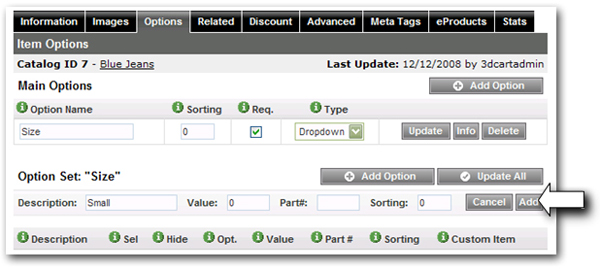
Once the Product Option has been created, you must add an Option Set to that option. This acts as the actual choice the customer is making, such as selecting between Small, Medium and Large for a Size Option. To add an Option Set:
- Click the Add Option button in the Option Set section. Type the specific product option for the option category you have just created in the Description field, i.e. Small for the option category of size.
- Click Add
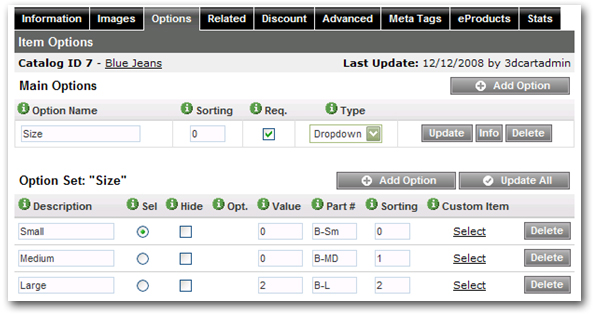
- Check the Sel radio button if you would like the option to be the default.
- Check the Hide checkbox if you would like the option to be hidden from the customer.
- Click on the Select link in the Opt. field if you are using DropImage. This will allow you to select your image for the option.
- Type in a value to add or subtract from the price of the product in the Value field. For example, if a Large is $2.00 more than the standard Small or Medium sizes, type in 2.00.
- Type in a number in the Part # field if this option has a unique part number. For example, a yellow sweater could have a different part number from a blue sweater.
- Type in the order number you would like your options to display to the customer in the Order field. Lower numbers will display before higher numbers.
- Click Update All.
Create Product Options for the Entire Category
If all of the products in one category have the same options, you can create the options in one place for the entire category, rather than going into each product individually to add them. For example, if you have a category of Sweaters with 50 products, and all sweaters come in small, medium, and large, this method will be useful to you.
- Go to Products Categories
- Click Options next to the category you want to add the product options to.
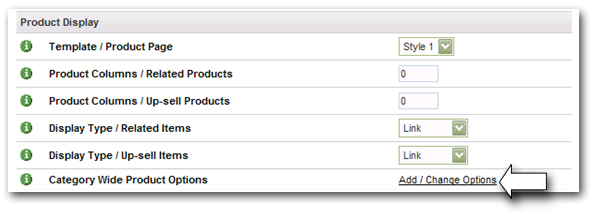
- Click on the Advanced Button.
- Click on Add/Change Options in the Category Wide Product Options field.
- Click the Add Option button and type in your Option Name, i.e. Size
- Type the Sorting number into the Sorting field - this will determine the order in which your options display if you have multiple options. A smaller number will display before a higher number.
- Check the Req. box if you would like this option to be required for checkout.
- Choose your type - the method you would like the option to be displayed.
- Click Add.
- Click the Add Option button in the Option Set section. Type the specific product option for the option category you have just created in the Description field, i.e. Small for the option category of size.
- Type in a value to add or subtract from the price of the product in the Value field. For example, if a Large is $2.00 more than the standard Small or Medium sizes, type in 2.00.
- Type in a number in the Part # field if this option has a unique part number. For example, a yellow sweater could have a different part number from a blue sweater.
- Type in the order number you would like your options to display to the customer in the Order field. Lower numbers will display before higher numbers.
- Click Add.
- Repeat this process for all options for the product.
To remove a specific product from using the category options you set:
- Go to Products View/Edit
- Click Edit next to the item you do not want to receive the category options.
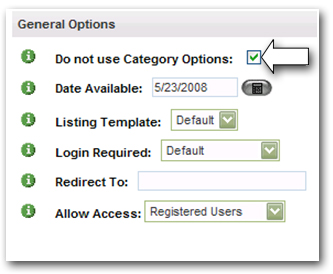
- Click on the Advanced tab.
- Check the Do not use Category Options checkbox in the General Options section.
- Click Save Changes.
Product Options Templates
If you have the same option that reoccurs many times for different products in your inventory, you can set a template of the option and automatically add it to your products. By doing this, you will not have to set up your option each time - you will be able to add the option template that has already been setup. To setup your option template:
- Go to Products Options Templates
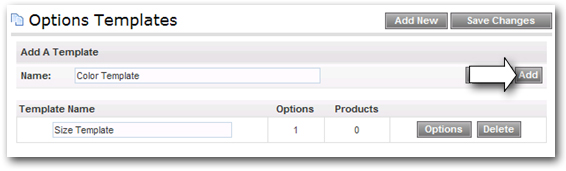
- Click the Add New button, then type the name of your option template in the Template Name field, i.e. Color Template.
- Click Add.
- Click on the Options button next to your newly added Template.
- Click the Add Option button and type in your Option Name, i.e. Color
- Type in the Sorting number - this is used to control how your options display if you have more than one for the same product. Lower numbers will display before higher numbers.
- Check the Req. checkbox if you would like this option required to be chosen by the customer to be able to add the product to the shopping cart.
- Choose the way you would like the option to be displayed in the Type field, then click Add.
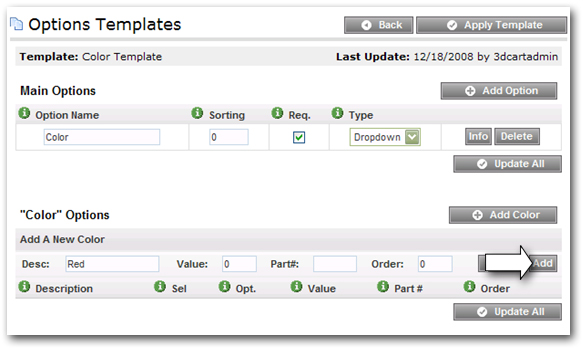
- Click the Add Option button in the Option Set section. Type the specific product option for the option category you have just created in the Description field, i.e. Red for the option category of Color
- Click Add
- Check the Sel checkbox if you would like the option to be the default.
- Click on the Select link in the Opt. field if you are using DropImage. This will allow you to select your image for the option.
- Type in a value to add or subtract from the price of the product in the Value field. For example, if blue is $2.00 more than the standard Red or Green, type in 2.00.
- Type in a number in the Part # field if this option has a unique part number. For example, a yellow sweater could have a different part number from a blue sweater.
- Type in the order number you would like your options to display to the customer in the Order field. Lower numbers will display before higher numbers.
- Click Add.
- Repeat the process for as many options you have for the product template.
- Go to Products View/Edit
- Click Edit next to the product you want to add the Option to.
- Click on the options Tab.
- Click Use Template.
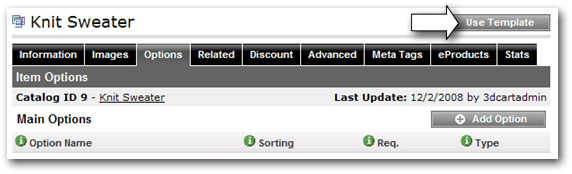
- Click Copy Options or Link to Template next to the Option Template you would like to insert. Link to Template means that any changes made to the template in the future will affect the options on the product automatically. Copy Options means that changes to the template in the future will not affect the options on the product at all.
- Repeat this process for all products you want to add the options template to. You can also add the template to an entire category of products by going to Products =>Categories and clicking the Category Wide Product Options button in the category you want.
Manage Stock Numbers for Products with Multiple Options
You can manage the stock numbers of products with multiple options by using the Advanced Options feature:
- Go to Products View/Edit
- Choose an item that has multiple options - click Edit.
- Go to the Options Tab.
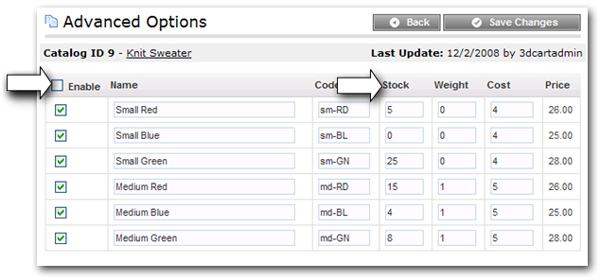
- Select Advanced Options
- This product has two options, Color and Size
- Check the Enable checkbox next to each product. Even if you do not sell a particular option combination, you must still enable it and enter '0' for the stock number so customers cannot purchase it.
- Type in the Code, Stock number, Weight, and Cost of each product. The weight you enter will add to the weight entered on the Information tab of the product.
- Click Save changes.
Bulk Importing Product Options
You have the ability to bulk upload all product options at once with the Import Product Options feature. To import product options (size, colors, etc), please make sure your products have already been imported. You cannot import your product options if your products do not already exist in the system. To import product options:
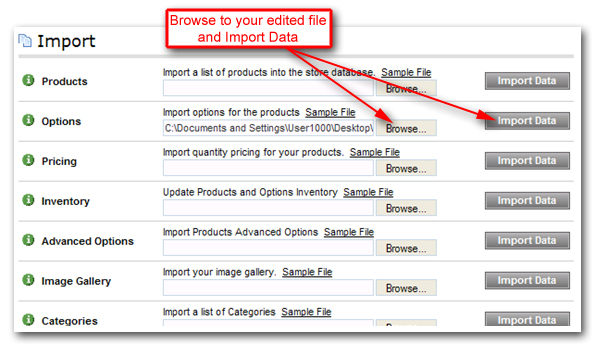
- Go to Products Export/Import
- Click on the link that says Import options for the products Sample File, above the Options field in the Import section
- Click Open
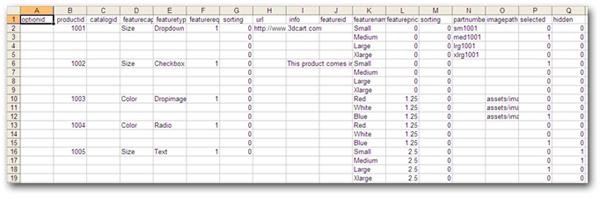
- You may now add product option information to the proper columns. Below is a description of each field:
Note: Do not remove, add, or edit any columns to this file. If you do not have a need for a column please leave it blank. This is the exact format the file needs to be to import your Product Option information properly.
- optionid: This field is filled in by the system. If you are doing a fresh import of new options then leave this field blank. The system will assign this ID.
- productid: This field is required. This is the id of the product that this option will be for. Make sure that the id matches the product.
- catalogid: If you are doing a fresh import leave this field blank. It will be filled in by the system.
- featurecaption: This is the Name of the option (i.e. Color, Size). This field is required.
Note: If the Feature Caption field is left blank, the system will not allow you to import the Product Option information.
- featuretype: This is the type of option you want to have. (i.e. Checkbox, Radio Button, Dropdown Menu). The acceptable paramaters are Dropdown, Radio, Checkbox, Title, Text, Textarea, DropImage, File.
- featurerequired: This tells the system if this option is required or not. 0 = no 1 = yes
- sorting: This field defines the order of the options. It only applies when there is more than one option. If no sorting is desired simply fill in 0 for all options.
- url: This field is used to define a URL for additional information. If filled out the info icon will show and be a link to this URL. This field is not required. If no url is desired then leave field blank.
- info: This field is used to define additional information about the option. If filled out the info icon will show and be a link to a pop up which will display this additional information. This field is not required. If no info is desired then leave field blank.
- featureid: This field is only used when updating options. It is required and pre-filled by the system. If you are doing a fresh import then leave this field blank.
- featurename: This is the name of the option. (i.e. Red, White, Blue or Small, Medium, Large). This field is required.
Note: If the Feature Name field is left blank, the system will not allow you to import the Product Option information.
- featureprice: This field defines an additional value for the option. When this option is filled in this value will be added to the base price of the product. If no additional value is desired then leave field blank.
- sorting: This field defines the order used to display the option values. If no order is desired then enter 0.
- partnumber: This field is used to define a specific id to this particular option (Ex. If you have a Size option of Small, Medium and Large; each option can have it's own unique id. Small can be sm001, Medium can be med1001, Large can be lrg1001).
- imagepath: This field only applies if you are using DropImage for the Feature Type. This should include the path to the image.
- selected: This field defines which option should be pre-selected by default. Enter 1 for the option you want to be pre-selected.
- hidden: This field defines if the option should be hidden from the customer. Enter 1 if you want the option to be hidden.
- Once you are done filling in your product options information into your columns, save the file to your computer.
- Go to Products =>Export/Import
- Browse for the file you saved in the Options field in the Import section.
- Click Import Data
- You will receive a screen that looks like this if done properly: