Shopping Cart Support
Edit Site Content
Site Content Section
In the Site Content section, you create and/or edit content pages. Content pages are all other pages on the website not related to products and categories, such as main menu pages like Home, About Us, Contact Us and additional content pages such as Terms and Condition, and FAQs. To edit or create the pages on your store:
- Log into your GoEmerchant Online Store Manager.
- From the left menu, go to Settings Design Site Content
- You will see 2 sections: Menu Links at the top and Extra Pages on the bottom half
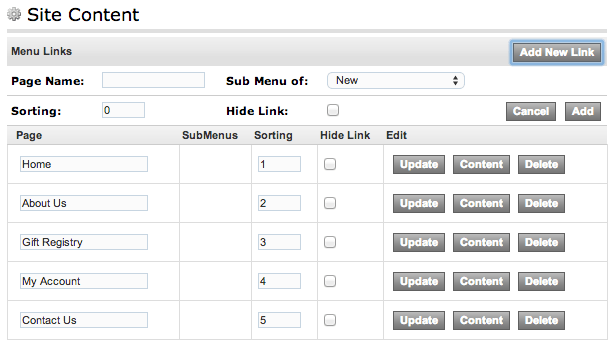
Menu Links
The menu links section creates and modifies pages on the store's main navigation menu. The look and layout of your main menu is dependent on the template you are using, but most templates will have the menu located on the top.
To add a new page to the Menu links section:
- Go to the Site Content section as described above
- Click "Add a New Link"
- Type the name of the page
- Select from the drop down if it is a new main page or a secondary page to an already existing menu page.
- Check "Hide Link" if you do not want the page to be available on the website
- Sorting determines what order the page will be in the main menu. Lower numbers display first. Make sure the sorting order does not conflict with another page.
- Click Submit, to create and add the page to the Menu Links listing.
To edit a menu link page:
While in the menu listing section, click "Content" next to the page you want to edit. The Content page has 9 parts:
- Link: If you would like the link to lead to another page such as the My Account page or an external link such as www.google.com, specify the link here.
- Frame Template: If creating a brand new page (i.e. not linked as above), you can create additional frame templates that will display for the content. (Click Here for more details)
- Target: This setting determines if the page opens in a new window/tab or in the current window
- Allow Access: Use this to restrict access to the page based on customer groups
- On fail redirect to: Should a restricted group attempt to access the page, they will be sent to the page entered here. If left blank, by default it redirects to the store's "My Account" page.
- Name: The name or label of the link on the menu bar
- Title: The title which display in the menu bar of the browser window
- MetaTags: Enter any SEO (Search Engine Optimization) keywords here or use the Tag wizard to assist you in generating keywords.
- Page Content: This is where you will add the actual content which includes (text, images, tables etc) to the page. You can either enter the content as regular text or HTML formated content. You can also use WYSIWYG to format your content more easily.
Click Save Changes when completed.
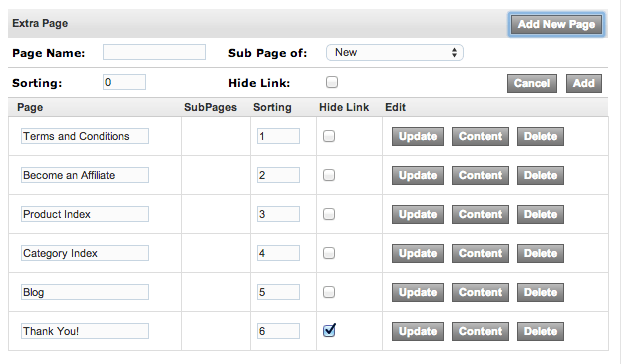
Extra Pages
Extra pages can be used for additional site content pages such as Privacy Policy, Return Policy, Customer Feedback and other secondary site related content. Extra pages can also be used for displaying pages with Database Feeds like a Terms and Conditions page. Depending on your site's theme, extra pages will usually display at either the bottom or left side of your page.
To add a new extra page:
- Go to the Site Content section as described above
- Click "Add a New Page"
- Type the name of the page
- Select from the drop down if it is a new main page or a secondary page to an already existing menu page.
- Check "Hide Link" if you do not want the page to be available on the website
- Sorting determines what order the page will be in the main menu. Lower numbers display first. Make sure the sorting order does not conflict with another page.
- Click Submit, to create and add the page to the Extra Page listing.
To edit a menu link page:
While in the Extra Page listing section, click "Content" next to the page you want to edit. The Content page has 10 parts:
- Link: If you would like the link to lead to another page such as the My Account page or an external link such as www.google.com, specify the link here.
- Frame Template: If creating a brand new page (i.e. not linked as above), you can create additional frame templates that will display for the content. (Click Here for more details)
- Target: This setting determines if the page opens in a new window/tab or in the current window
- Allow Access: Use this to restrict access to the page based on customer groups
- Use Database Feed: Mark this checkbox if you'd like to have the page's content controlled via a database feed. Please review our Database Feed article for more information on this topic.
- On fail redirect to: Should a restricted group attempt to access the page, they will be sent to the page entered here. If left blank, by default it redirects to the store's "My Account" page.
- Name: The name or label of the link on the menu bar
- Title: The title which display in the menu bar of the browser window
- MetaTags: Enter any SEO (Search Engine Optimization) keywords here or use the Tag wizard to assist you in generating keywords.
- Page Content: This is where you will add the actual content which includes (text, images, tables etc) to the page. You can either enter the content as regular text or HTML formated content. You can also use WYSIWYG to format your content more easily.
Click Save Changes when completed.