Transaction Center & VPOS Support
Custom Fields
Additional Fields
Custom additional fields can be created to capture additional information when running a transaction. These are merchant-created fields that will appear when running at transaction at the bottom of the form. These can be useful for capturing Invoice #, Member #, and more.
- Log in to your transaction center.
- Go to Main Options Additional Fields
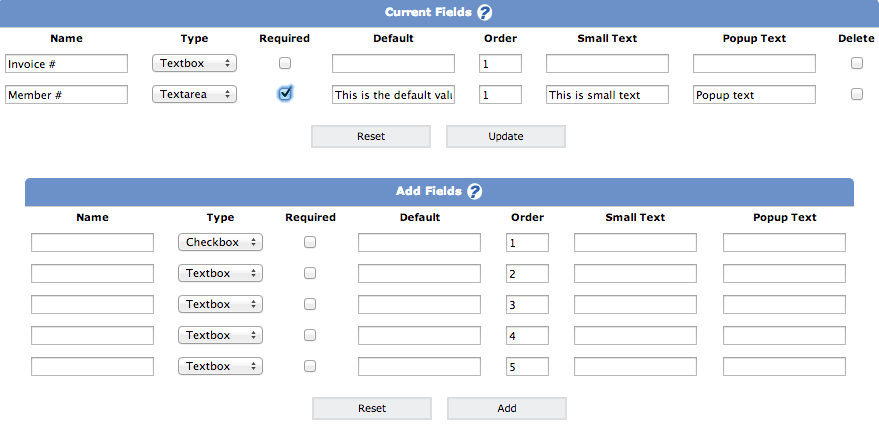
- In the Add Fields section, type the name of the additional field you wish to add in the Name box.
- Select the input type. Textbox will allow users to type the value in a small box. Textarea presents users with a large text area to enter the value into. Checkbox gives them the option to mark off a check box.
- Check the Required check box if you'd like for the additional field to be required for each transaction.
- The value in the Default box will appear in the text area if text box or text area are selected as the type. This field is not required.
- Order determines the vertical order of additional fields on the Authorize Transaction screen. The lower the number, the higher up on the page it will be.
- Small text is small help text that will appear below the label for the Additional Field. This field is not required.
- If popup text is entered in the Popup Text box, there will be a question mark icon next to the additional field on the Authorize Transaction Screen. When clicked, the content of this popup text box will display. This field is not required.
- Click Add. If updating an existing field, click Update.
- When Delete is checked and then 'Update' is clicked, the field will be deleted.
After additional fields are created, they can be viewed and edited in the Current Fields section of the Additional Fields page. To edit, simply make the necessary changes to the corresponding fields, and click Update.
This is what the additional fields will look like from the Authorize Transaction screen:

Custom Required Fields
You have the ability to choose which Address and Card fields are displayed and required on the "Authorize eCommerce/MOTO/Retail Transaction" screen so that fields that would normally be optional can be made required. However, you do not have the ability to set these options for the information required to authorize the transaction. By default all the fields listed are displayed, which is recommended.
- Log in to your transaction center.
- Go to Main Options Custom Required Fields
- Click the Required and Display on Screen radio buttons next to Yes or No for each field, as you desire
- Click Submit
