Transaction Center & VPOS Support
Recurring Billing
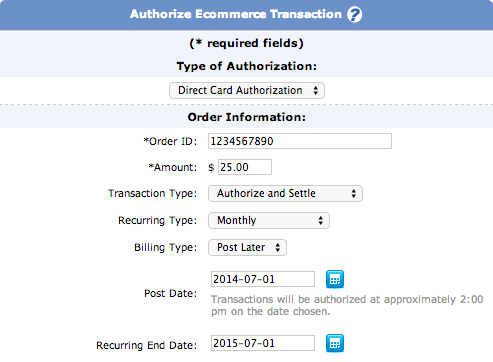
How to Enter a Transaction for Recurring Billing
- Log in to the transaction center.
- Go to Virtual Terminal Authorize Transaction
- Enter order information, and set Recurring Type (this will reflect the recurring frequencies that can be selected such as daily, weekly, monthly, etc)
- Select the Billing Type of either Post Now or Post Later
- Enter a Recurring End Date
POST NOW: The actual recurring billing will run on the selected frequency for the date that it was authorized. Example: Entering in a transaction on 2/15/16 with a monthly recurring frequency will result in the recurring transaction running on 3/15/16.
POST LATER: The recurring billing will run on the selected scheduled frequency on the date that was selected to be posted. Example: Entering in a transaction on 2/15/16 with a post later date of 2/20/16 with a monthly frequency will result in the recurring transaction running on 3/20/16 of the following month.
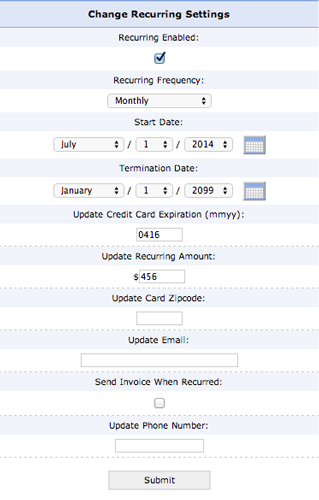
How to Edit a Recurring Transaction
- Log in to the transaction center.
- Go to Recurring Billing Search Recurring Transactions
- Search for the transaction by any preferred criteria or bypass all and click Begin Search.
- The next screen will show all transactions that match the search criteria. Click on the magnifying glass icon to the left of the recurring customer that needs to be revised.
- Changes can be made to enable, disable, change the frequency, dates or amounts.
- After the changes have been made, scroll to the bottom of the page and click submit.
Notes
If a recurring billing transaction fails as a result of any type of decline, it will disable it from recurring billing and need to be enabled.
To completely remove a recurring billing customer you will need to uncheck the 'recurring enabled' box and set the frequency to 'none'.