Transaction Center & VPOS Support
User Management
The user management tab can be found in the transaction center. This area will allow the administrator to set up users to access the transaction center. Transactions will then reflect that particular username in the transaction details. The users can be granted certain permissions. As an example, an administrator can set a user to only authorize transactions but not settle them.
Add New User
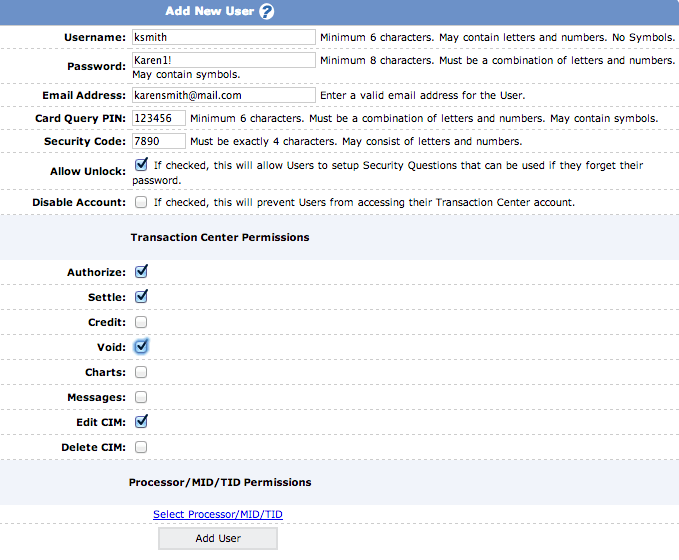
The administrator can add users and set permissions in this area.
- Go to User Management Add New User
- Enter the username (may contain letters and numbers, cannot contain symbols)
- Enter the password for that user
- Enter a valid email address for the User
- Card Query Pin: This pin number consists of 6 digits. This will allow the user to view the full set of credit card numbers for a transaction if they enter this in
- Security Code: This is a 4-digit code that this user will have to provide to tech support if the user is locked out. Tech support CAN NOT unlock a user without this code
- Allow Unlock needs to be checked off if this user is permitted to be unlocked by tech support. If unchecked, only the administrator on the account can unlock the user.
- The Disable Account option would be selected if this user is to be made inactive
- Transaction Center Permissions are the functions that this user would have access to which are authorize, settle, credit, void, charts, messages, edit CIM and delete CIM. Each option would need to be checked for the permissions to be granted
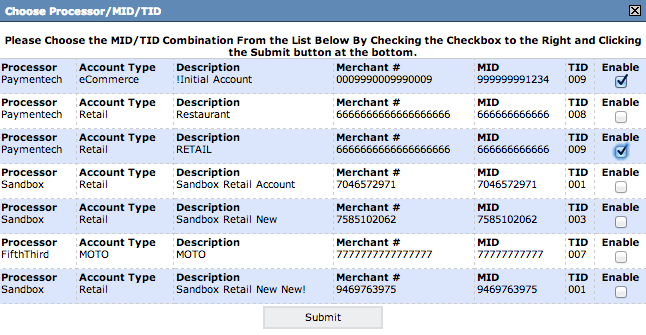
- Processor/MID/TID Permissions is the area that allows you to choose where the user has access. If there is one merchant account associated with the transaction center, the user will need to be added to it. If there are multiple merchant accounts associated with the transaction center, permissions will need to be granted to the merchant IDs that a user has access to. Click the Select Processor/MID/TID link and in the pop-up window, mark the checkboxes in the Enable column for the accounts you'd like the user to access, then click Submit.
- Click the Add User button at the buttom of the page.
Please note that if you would like tech support to unlock your user in the event that they lock themselves out you have to check off "Allow Unlock" and set their security code.
Modify User Settings
This area will bring up all users on the account for modifications or if the administrator needs to unlock that user's transaction center.
- Any changes can be made in this area such as permissions, disabling etc.
- Once the changes have been made the administrator will need to click on "update users"
- If a user is locked out, they can be unlocked from here. The Locked column will be checked off, the administrator can uncheck the Locked box and click Update Users.
Delete Users
This area will allow the administrator to delete a particular user on the account.
- Click on User Management Delete User
- Check off the Delete box
- Click on Delete Users