Shopping Cart Support
Shipping
Basic shipping setup information and Real-Time Shipping Methods such as UPS, USPS or FedEx can be found in the Setup Guide here. This guide will discuss custom shipping methods, shipping options, and sample configurations, as well as common Shipping troubleshooting tips.
Custom Shipping Methods
Getting Started:
Custom Shipping Methods, also referred to as Offline Shipping Methods, are useful for creating a specialized shipping method. They are called offline because they do not require communicating with a mail carrier, a price is just added automatically based on the parameters of the method. To create a custom shipping method:
- To begin adding a shipping method login to your store manager and from the left navigation menu, go to Settings Shipping Shipping Methods. Update the Real Time Shipping Information field with the address you will be shipping your products from.
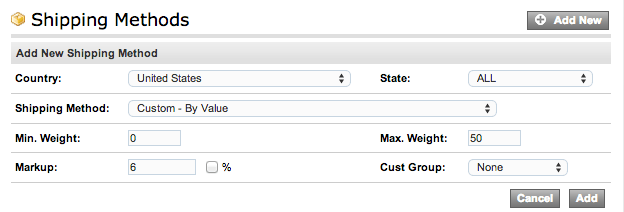
- Under the Settings Shipping Shipping Methods, Click on the "Add New" button.
- Select the country and state the shipping method will apply to
- In the "Shipping Method" field, select either Custom - By Quantity, Custom - By Value, or Custom - By Weight.
- Enter the Minimum and Maximum weight limits. This is an overall weight limit used if you only want the shipping method available to orders with specific weight limits, i.e. 1 lb - 100 lbs.
- Enter a Markup value if you want to add a charge on top of the estimated shipping rate. This could be either a percentage or a flat amount.
- Select a Customer Group. This is used to restrict the shipping method to specific customers. Setting this to 'None' will make this available to all customer groups.
- Click Add.
- If you would like to exclude any states from using this shipping method, click on the Exclude List link in the newly added shipping method section.

Shipping by Weight
If you chose shipping by weight, you will now need to set up your weight ranges and shipping rates. The rate can be either be a flat rate, or a percentage of the total; if the shipping rate is a flat rate, then it can be applied to the entire order, or "Per Item".
- After you have completed steps 1 - 9 above, click on the Edit Ranges link in the newly added Shipping by Weight section.
- Click Add New
- Enter the Min. and Max. weight for your first range, i.e. 1 and 20 respectively
- Under Shipping, enter the charge e.g. 5.00 - you may also choose to make it a percentage of the total order by entering a value such as 5 and checking the % box, i.e. 5%
- Click Add
- Enter the next range, repeating steps 1 to 5, until you have set all of your weight and shipping ranges.

In the image above, the first weight range is 0-10 pounds. If the order's weight is within that range, the shipping cost will be 6% of the order. The second range is 11-20 pounds. If the order's weight is within that range, the shipping cost will be $10.00.
Shipping by Quantity
If you chose shipping by quantity, you will need to set up your quantity ranges and your shipping rates. The rate can either be a flat rate, or a percentage of the total; if the shipping rate is a flat rate, then it can be applied to the entire order, or "Per Item".
- After you have completed steps 1 - 9 in the "Getting Started" section above, click on the Edit Ranges link in the newly added Shipping by Quantity section.
- Click Add New
- Enter the Min. and Max. quantity for your first range, i.e. 1 and 20 items respectively.
- Under Shipping, enter the charge e.g. 5.00 - you may also choose to make it a percentage of the total order by entering a value such as 5 and checking the % box, i.e. 5%
- Click Add
- Enter the next range, repeating steps 1 to 5, until you have set all of your quantity and shipping ranges.

In this example, the first quantity range is 5 to 100 items. If the order's quantity is within that range, the shipping cost will be 5% of the order. The second range is 101 - 200 items. If the order's quantity is within that range, the shipping cost will be $10.00.
Shipping by Value
If you chose shipping by value (value of the order), you will need to set up your value ranges and your shipping rates. The rate can be either be a flat rate, or a percentage of the total; if the shipping rate is a flat rate, then it can be applied to the entire order, or "Per Item".
- After you have completed steps 1 - 9 in the "Getting Started" section above, click on the Edit Ranges link in the newly added Shipping by Value section.
- Click Add New
- Enter the Min. and Max. Value for your first range, i.e. 1 and 20 respectively.
- Under Shipping, enter the charge e.g. 5.00 - you may also choose to make it a percentage of the total order by entering a value such as 5 and checking the % box, i.e. 5%
- Click Add
- Enter the next range, repeating steps 1 to 5, until you have set all of your value and shipping ranges.

Shipping by Zip Code
If you chose shipping by zip code, you will need to set up your zip codes and your shipping rates. The rate can be either be a flat rate, or a percentage of the total; if the shipping rate is a flat rate, then it can be applied to the entire order, or "Per Item".
- After you have completed steps 1 - 9 in the "Getting Started" section above, click on the Edit Zip Codes link in the newly added Shipping by Zip section.
- Click Add New
- Enter in the Zip code you would like to ship to in the Zip Code field.
- Under Shipping, enter the charge e.g. 5.00 - you may also choose to make it a percentage of the total order by entering a value such as 5 and checking the % box, i.e. 5%
- Click Add
- Enter the next range, repeating steps 1 to 5, until you have set all of your zip code and shipping ranges.

In this example, the first zip code is 08002. If the order is being shipped to that zip code, then shipping cost will be 5% of the order. The second zip code is 08035. If the order is being shipped to that zip code, then shipping cost will be $10.00.
Shipping Options
Overall, you have many shipping options that are customizable to your needs. There are a few shipping options that can be changed the same way, no matter what type of shipping method you have.
Excluding States
You will use this option if you want to exclude certain states in your selected country from using the shipping method you have chosen.
- Go to Settings Shipping Shipping Methods
- Click on Exclude List in the Options section in the shipping method you have added

- Click Add Location
- Select the State you would like to exclude and click add.
- You can exclude as many states as needed.

In the example above, Kentucky orders have been excluded from using 2nd Day Air as a shipping method. Illinois is being selected to be added to the exclusion list for this shipping method.
Specify Countries/States to Ship To
To update the list of countries and states you would like to ship to:
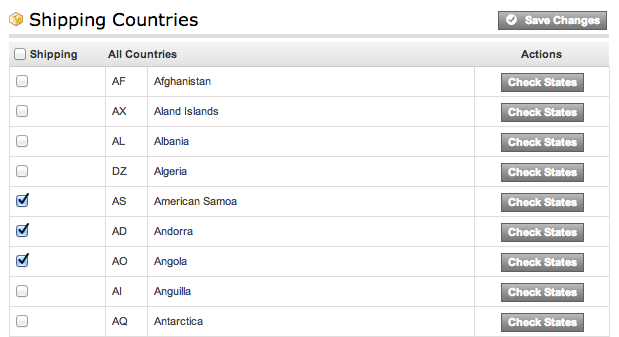
- Go to Settings Shipping Shipping Countries
- In the Shipping column, check the countries you want to deliver to and leave the box unchecked if you do not want to deliver to them.
- Click Save Changes

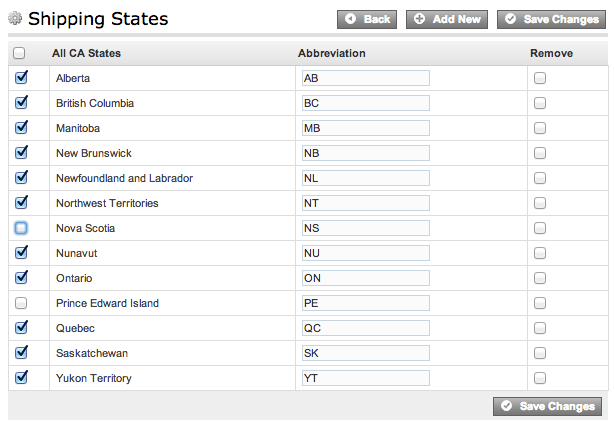
- On the Countries you want to deliver to, click the Check States button. In this example, the countries Algeria, United States, and Canada are chosen to receive shipping
- Check the checkbox next to the state if you want to make it available, or uncheck it if you want to make it unavailable.
- If you want to remove the state, check the Remove box and click Save Changes.
- To add a new state, click the Add New button, then type in the state name and the two letter abbreviation in the Add a New State fields.

Multiple Shipping Distributors/Drop Ship
Your company may have multiple shipping distributors for the products you sell. Therefore, the shipping rates will differ, depending on where your product is shipped from. To set up multiple shipping distributors:
- Go to Settings General Distributors
- Click Add New
- Fill out the company name, contact name, address, city, state, zip code, and country fields for your distributor.
- Check the Use for Shipping checkbox
- Check the Notify on New order checkbox if you would like notification to be sent to your distributor when a customer places an order.
- Copy and paste the HTML email template for the New Order - Merchant email in the Settings Design Email section into the Email Message field for the Distributor.
- Click Save Changes
- Go to any product that will be shipped out by this distributor (Product View/Edit).
- Under the Information tab in the Distributor field, choose the distributor you have generated.
- Click Save Changes.
- Repeat this process for as many distributors you need. If you do not select a specific distributor for an item, the shipping address will default to the one you have chosen in the Shipping Methods section (Settings Shipping Shipping Methods).
Shipping Will Be Calculated Later
The "Shipping will be calculated later" option is an option that allows customers to place orders on your site when the available shipping methods don't apply to the address provided. The common causes for this include the following: invalid addresses, the weight of the order is not in the valid weight range for the available shipping, the customer belongs to a customer group with no shipping options, the customer is in a country with no available shipping options, etc.
- Go to Settings Shipping Shipping Settings.
- Check Allow "Shipping will be calculated later"
- Click Save Changes.

NOTE: If you disable this option, customers with invalid addresses won't be able to place orders. An error message will be displayed to customers stating that there are no available shipping options for their address.
Setting a Maximum Weight per Shipping Box
You may want to set a maximum weight of items each box will hold per shipment. For example, you may want each box to weigh no more than 50 pounds per order. Therefore, if a customer makes an order that is a total of 100 pounds, shipping can be calculated for two 50 pound boxes (ultimately this will affect your actual shipping cost so the estimate is calculated, it is more accurate). Also note, each shipping company has their own rules. For example, UPS and FedEx do not ship boxes larger than 150 pounds. Before setting up the rules, it's a good idea to talk to the shipping company of your choice you determine which shipping methods would be optimal for your business. To set a maximum weight per box:
- Go to Settings Shipping Shipping Settings
- Type in the maximum weight you want each box to hold in the Max Box Weight (Lbs) field.
- Click Save Changes.
Sample Configurations
Free Shipping
You may want to have free shipping for all of your customers, or just some in certain states. To set up free shipping:
- Under the Settings Shipping Shipping Methods, click the "Add New" button.
- Select the country and state the free shipping will apply to (If you only want this to apply to domestic customers, make sure you select only the country you are in).
- In the "Shipping Method" field, select Custom - By Value
- Enter the Minimum and Maximum weight limits - if this will apply to all of your packages, you will want to make the range high i.e. 0 lb - 999 lbs.
- Do Not enter a Markup value.
- Select the customer group you want free shipping to apply to. If none is selected, it will apply to all customers.
- Click Add.
- Once the "Custom - By Value" method has been added, click on the Edit Ranges link, then click the Add New button.
- Enter the Min. and Max. Value for your range (needs to be set high if all of your customers are to receive free shipping), i.e. 0 and 99999 respectively.
- Under Shipping, enter 0.00 for the charge.
- Click Add
- Once done, click on Back.
- Change the "By Value" caption to "Free Shipping".
- Click Update.

If you'd like to allow Customer Pickup Orders, follow this procedure and set the state to the one in which your business resides. You could also set up a Custom Shipping Method by Zip, and isolate it strictly to Zip Codes within the range you'd like to offer Pickup Orders to. That process is detailed above in the "Shipping by Zip Code" section.
NOTE: There are two other ways of adding free shipping. You can create a promotion for free shipping and enable it, or you can choose a specific item and check the free shipping box.
Free Shipping if an Order is over $XX
You may want to only give free shipping to orders that are over a certain amount of money. The process for this is very similar to setting up free shipping in general - you just need to tweak your ranges a little differently. In this step-by-step, we will use the example that the customer will receive free shipping only if they purchase $100.00 or more. To set up this option:
- Under the Settings Shipping Shipping Methods, click the "Add New" button.
- Select the country and state the free shipping will apply to (If you only want this to apply to domestic customers, make sure you select only the country you are in).
- In the "Shipping Method" field, select Custom - By Value
- Enter the Minimum and Maximum weight limits - if this will apply to all of your packages that meet this requirement, you will want to make the range high i.e. 0 lb - 999 lbs.
- Do Not enter a Markup value.
- Select the customer group you want free shipping to apply to.
- Click Add.
- Once the "Custom - By Value" method has been added, click on the Edit Ranges link, then click the Add New button.
- Enter the Min. and Max. Value for your range for free shipping. This will be the range at which your customers can receive free shipping i.e. 100 - 999.
- Under Shipping, enter 0.00 for the charge.
- Click Add

- Once done, click on Back to Shipping Methods.
- Change the "By Value" caption to "Free Shipping".
- Click Update
NOTE: Since the range for this method starts at a certain amount, i.e. $100.00, the free shipping will not show up at checkout unless the order is at least the minimum in the range, i.e. $100 in this example. Therefore, you must have an alternate method of payment set up for orders that need to pay for shipping, i.e. set up another Custom - By Value payment method with a range that goes from 0 - 99 with a shipping cost entered.
Troubleshooting
Shipping Method is not Displaying
If your shipping options are not displaying/functioning properly, there are a few settings you can double check to make sure everything has been configured properly (in no particular order):
- Make sure you specified the correct shipping warehouse. This is the address at the top of the page in Settings Shipping Shipping Methods.
- Make sure there is not a space after your zip code in the shipping warehouse address. This is the address at the top of the page in Settings Shipping Shipping Methods.
- Make sure you have at least one Shipping method created in the Settings Shipping Shipping Methods section. Make sure it is ENABLED.
- Make sure the item purchased is within the specified weight range you configured for your shipping method.
Example: If the weight range for the shipping method is between 1 lb - 100 lbs, and the items purchased are 150 lbs, the software will not display that particular shipping option. You can see your weight range on your shipping method by going to Settings Shipping Shipping Methods and looking at the Min. and Max. weight fields. - Make sure the country/state that has been selected for the checkout shipping address is not in the Exclude list. You can see the exclude list by going to Settings Shipping Shipping Methods and clicking on the Exclude list link in the shipping method.
- Make sure the customer group you specified for the shipping method is the group that made the order. If you want all customers to use this shipping method, make sure the Customer group is set to All. (Settings Shipping Shipping Methods).
- Make sure the address placing the order is within the shipping method parameters.
Example: If you setup UPS Ground as your shipping method, and the address that places the order is outside the United States, this particular option will not appear. Make sure you have at least 1 domestic and 1 International shipping option if you want to ship outside the United States. - If you are using Custom - Value, Custom - Weight, Custom - Quantity, or Custom - Zip, make sure your shipping ranges have been set. Go to Settings Shipping Shipping Methods and click on the Edit Ranges link in the shipping method.
- If you have USPS First Class, make sure your shipping weight range is between 0-1 lb, as all USPS rates will error if you are trying to ship something that is over this maximum weight. (USPS First Class only ships letters).
- If you are using an account with USPS/UPS/FedEx, make sure the account information is entered correctly in Settings Shipping Shipping Settings and that you account has been enabled with them. You can test this by erasing the account information entered in the Shipping Settings section and trying to checkout again. If the shipping method shows up, you know the account information is either not active, or invalid.
- Make sure the Max Box Weight is not at a very low value in Settings Shipping Shipping Settings (the default is 75 lbs).
NOTE: Each shipping company has their own rules. For example, UPS and FedEx do not ship boxes larger than 150 pounds. Others, like USPS Priority only apply if weight is more than 1 pound. USPS First Class applies up to 13 oz (0.8 lbs) extra. Before setting up the rules, it's a good idea to talk to the shipping company of your choice you figure out which shipping methods would be optimal for your business.
Shipping Prices are Higher/Lower than Expected
If you come to checkout and you see that the estimated shipping prices are either higher or lower than the actual cost of shipping, there are several settings you can double check to see why these shipping estimates could be off:
- If you have an account with UPS/FedEx/USPS, make sure the account information is entered in correctly (Settings Shipping Shipping Settings).
- Make sure the actual weight on your items are input correctly. For Example: If you enter the weight of a shirt as 1lb in the product information section, and the shirt is actually 1.5 lbs, this will affect your shipping cost.
- Did you calculate the weight of your shipping materials, i.e. boxes/packing materials? If not, you may want to add a Markup on your shipping costs to account for this (Settings Shipping Shipping Methods).
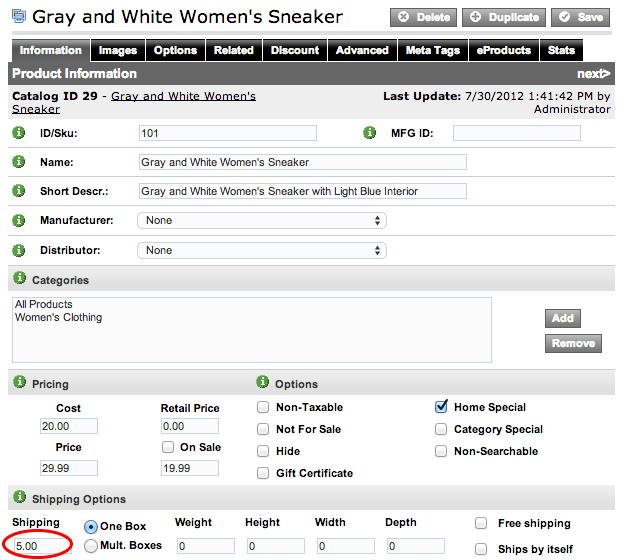
- Is there a shipping cost set on the product information section? If so, this will add that value in addition to what your shipping method will estimate. To see if you have a value input in this section, go to Products View/Edit. Click Edit on the product you want to see, then look at the Shipping field, under the Pricing/Shipping section.

- Do you have a Markup on your shipping method (Settings Shipping Shipping Methods)? This value will add to the shipping price.
- Are the number of boxes being shipped the same as what is specified in the Max Box Weight section (Settings Shipping Shipping Settings)? See Setting a Maximum Weight per Shipping Box
- If the Free Shipping method is showing up and it should not, make sure your product is not marked as a Gift Certificate. You can check this by going to Products View/Edit and clicking Edit next to the product in question. Make sure Gift Certificate is Unchecked.
- If you are using Custom - Value, Custom - Weight, Custom - Quantity, or Custom - Zip, is the Per Item checkbox checked? This will calculate the shipping value for each item rather than for the total order. You can check this by going to Settings Shipping Shipping Methods and clicking on the Edit Ranges link in the shipping method.
