Shopping Cart Support
Setup Guide
Table of Contents
- Introduction
- Step 1. Getting Organized
- Step 2. Logging In
- Step 3. Setup Wizard
- Step 4. Store Manager
- Step 5. Categories
- Step 6. Add Product
- Step 7. Categorizing your Product
- Step 8. Adding a Product Description
- Step 9. Adding an Image to your Product
- Step 10. Shipping Methods
- Step 11. Online Payment Methods
- Step 12. Offline Payment Methods
- Step 13. Selecting the Look/Feel of your Store
- Step 14. Altering the Look/Feel of your Store
Introduction
With this guide, you'll be ready to begin selling your products in no time at all. Additionally, your new 1stpaygateway store contains built-in integration with several popular Ecommerce tools including:
- Shipping Carrier Calculations- USPS, UPS, FedEx, CanadaPost
- Order & Shipping Managers- StoneEdge, ShipWorks
- Social Media Tools- Facebook Store Built in Blogging, Social Bookmarking
- Marketing Tools- Newsletters, Shopping Engines, SEO & more!
This guide is intended to help you begin setting up your store. This will be a brief introduction to familiarize you with the basic concepts and navigations involved when designing the store. Please keep in mind however, that your new 1stpaygateway store has many extensive features which may not necessarily be covered in this guide. Feel free to explore your cart to view all of the different options available to you.
Step 1. Getting Organized
The first step in setting up your store is to organize the materials you have received from GoEmerchant. This will help ease the startup process and make the steps outlined in this document go more smoothly. You will need the following:
- Your GoEmerchant Welcome email, which was emailed to you at the time of sign-up. This welcome email contains your login information as well as your login URL.
- This "Getting Started Guide".
- A product for your store, so you can enter the necessary information while following this guide. As this product will just be used as a beginning exercise, feel free to make a test product and specify the parameters on the fly.
- An image for your product so you can specify the product's display image.
- A category for your product, so you can participate in the category exercise of this guide. As with the product listing, this can also be a test category if you'd like.
In the next few steps we will be using the items and concepts above to create a product in your store.
Step 2. Logging into your Online Store Manager for the First Time
In your welcome email you will find several pieces of information that you will use to access your store. Because your domain name may not yet be pointed to our servers, we've provided you with a default "placeholder" URL which can be used to access both your storefront and Online Store Manager while the domain is being transferred. Once you've received your Welcome email, open it and refer to the Store Manager URL. Directly beneath this area you will be given your default username and password. Enter them in the Username and Password fields and click Login.

Note: The default username and password are both: storeadmin1, however, the first time you login, the system will prompt you to change it. Simply re-enter the existing password (storeadmin1) and a new password of your choosing, make sure that it's at least 6 characters long, and contains both letters and numbers. Make note of this password, as you will need to enter it each time you log into the Online Store Manager.
Step 3. 1stpaygateway Setup Wizard
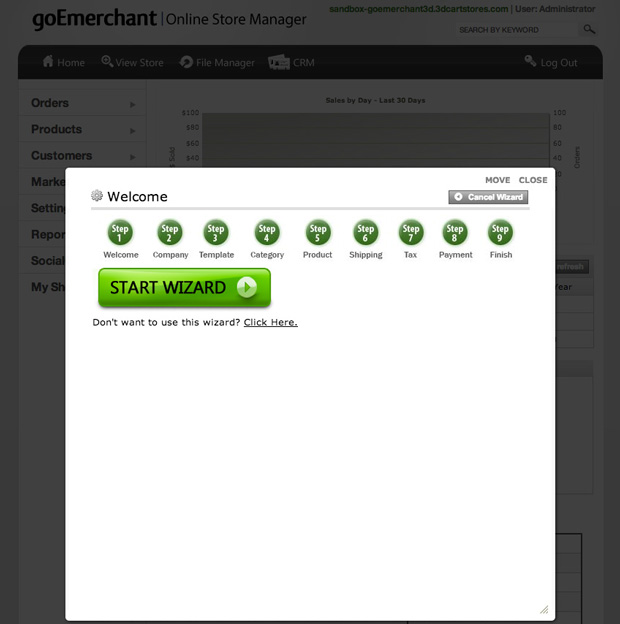
Upon logging into your Online Store Manager for the first time, you will be presented with the Setup Wizard. The Wizard will provide a brief overview of the steps involved in creating your online store.
Note: After the Wizard steps are completed, the Wizard will cease to run upon future logins. Furthermore, at the first step of the Wizard, you will see a button labeled "Cancel Wizard". This button will disable the Wizard for your store altogether. If you accidentally disable the Wizard or otherwise would like for it to return, please contact Support at 888-711-3800.
The steps outlined in the Wizard are very similar to the steps outlined in this guide. Therefore, if you prefer to use the Wizard, feel free to close this guide and continue with the Wizard instead. Otherwise, continue onto Step 4.
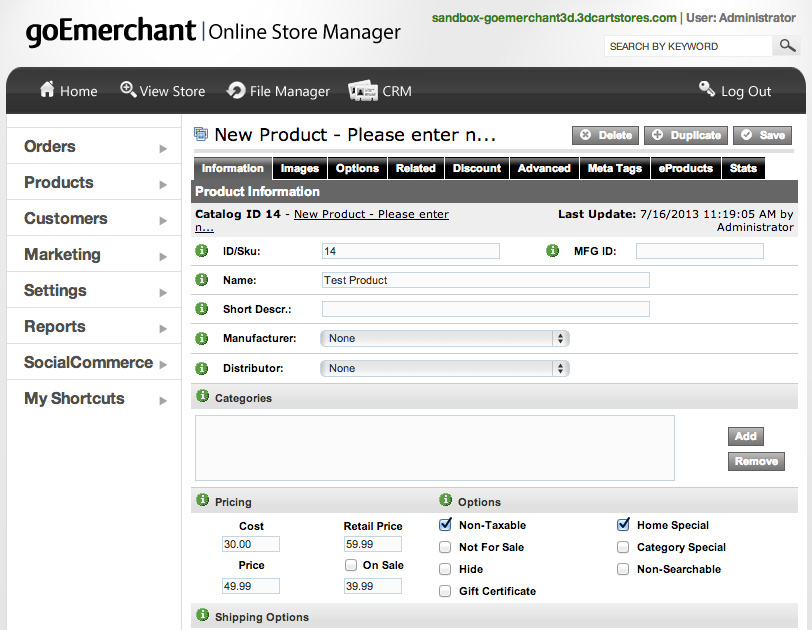
Step 4. Online Store Manager Navigation
Let's take a moment to review the Navigation of the Online Store Manager. Below is an example of your Online Store Manager's Home Page.
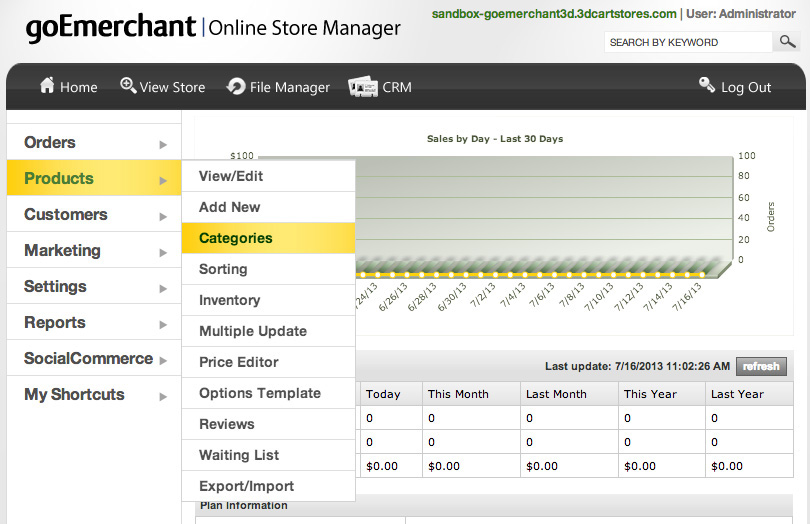
At the top of the Online Store Manager you will see the following links:
- Home- Use this to return to the main page of your Online Store Manager
- View Store- This will open up your storefront in a separate window for reviewing
- File Manager- This will take you to the file upload section of your Online Store Manager where you can upload images and files.
- CRM- This will take you to your Customer Relationship Manager.
- Log Out- Logs you out of the Online Store Manager.
On the left side of the interface, you will see additional menus with which you can navigate through your store settings. Typically these menus will contain submenus that expand as you hover over their parent topics. These are known as "Fly-out Menus". For the purposes of this guide, we will describe these fly-out menus in the following manner: "menu sub-menu sub-sub-menu".
For example, to get to your category settings, you would go to: Products Categories
Step 5. Creating Categories for your Store
Categories are used to separate your store into different sections. They can then be used to sort and classify your items into an easily navigated format. For example, a clothing store may wish to separate items into Men's and Women's categories to make the shopping experience easier for the customer. To add categories:
- Go to Products Categories
- Click on the button marked "Add New".
- Type a Name for your Category in the Category Name textbox.
- Click "Add" to create your Category.
In the example below we have added three main categories: All Products, Women's Clothing and Men's Clothing. If desired, you can add sub-categories by selecting the "parent" category when creating a new category. For example, under Men's clothing, you may wish to have a sub-category for shirts. When creating the Shirts category, you would simply specify this new category as a sub-category of "Men's Clothing".
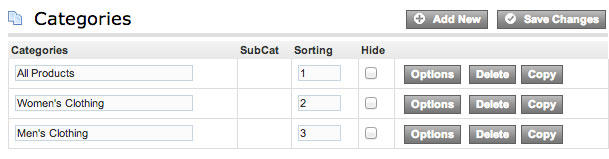
You can also change the order in which the categories display on your store by changing the numbers in the sorting box. The higher the number, the lower the category listing will show up on your store.
Step 6. Adding a Product to your Store
Products are defined as the items you plan to sell. Whether you sell physical items or a type of service, the process of adding your items is the same. It's basically as simple as typing in the product's information. To add a product:
- Go to Products View/Edit.
- You will be brought to the Products List. At the top right, click the "Add New" button.
- Now simply fill in the blanks that apply to your product. For the purposes of this Getting Started guide, the only required fields you need are the Product Name and Price. Fill those in under the Information Tab.
- Under the Pricing Section, input the cost of the item, the retail price the item generally sells for if desired (this will display in your store), and the price you sell the item for at your store.
- When you are satisfied with your work, click the Save button.
- For more information on other Product information that can be entered, see here.
Once the product is saved, you'll notice that the Name you specify for the product will be reflected next to its Catalog ID. As stated earlier, Name and Price are the only two required fields. However there are plenty more fields which you can populate, see more information on those fields here.
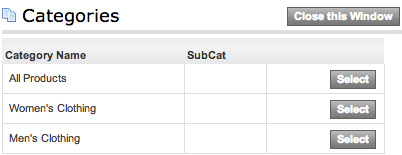
Step 7. Categorizing your Product
At this point, you have a product listing populated with name and pricing information. You can now add the product to any of the categories you specified in step 5. To do this:
- Go to the product's Categories section.
- Click on "Add".
- Click the Select button next to each category you would like to add the product to.
- Click 'Close this Window' to return to your product listing. You will see the Category Names in the Categories section for the product you're working on.
- Click "Save" to commit the changes.
Step 8. Adding a Product Description
In this step, we will add a description for your product. This can be done on the item listing's main information tab if you scroll down a bit to the section labeled "Description". The more information you provide on the product description, the more information your customer has to make a decision about the item, so try to include as much information as possible. The description field will take both text as well as HTML formatting. If you are not comfortable with HTML formatting, you can use the WYSIWYG* editor located on the right side of the Description field, by clicking "WYSIWYG Mode on/off".
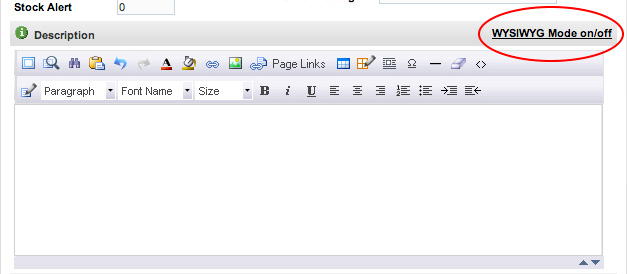
*WYSIWYG: (pronounced: wizzy-wig) stands for "what you see is what you get" and is a basic HTML editor that can be used to used to format your descriptions in a familiar "word processor"-type of design environment. The WYSIWYG editor can be used to apply tables to your description, text formatting and images - all without any knowledge of HTML coding.
Step 9. Adding an Image to your Product
Aside from your description, the best way to showcase your items is through the use of product images. Later on, when you become more adept at using the online store manager interface, you'll be able to specify additional product images as well as embed YouTube videos to your product listings to really make the items jump out. For this Getting Started guide though, we'll show you how to upload your main image.
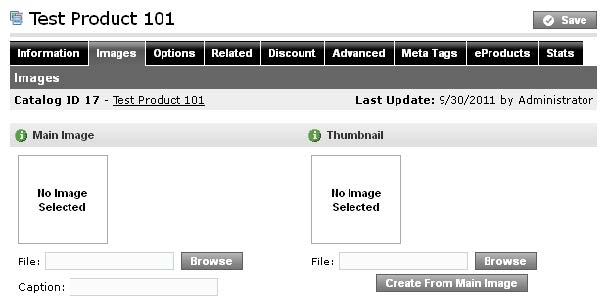
To begin, let's have a look at the product listing screen we've been dealing with so far. At the top of the product listing page, you will see a series of tabs:
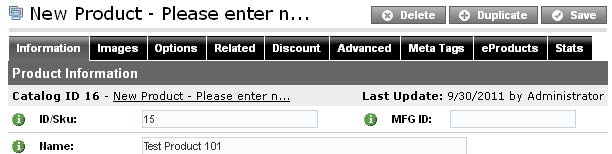
Up until now, we've dealt mostly with the product's Information tab. Now, we'll be moving onto the product's Images Tab. Click on the Images tab to begin. Within the Images tab, you will see a section specified for your product's main image. This will be the image that displays when a customer is viewing the full product listing.
To add an image:
- Below Main Image, click on the button labeled "Browse" and you will be taken to an Image Manager screen.
- To continue, click on the button marked "Select a new image from my computer".
- From the next screen, click Browse to browse through your computer files to select the image.
- After your image is specified, click "Submit Image" to upload the file.
- During the upload process you will be shown a preview of your selected image and you will be given the option of creating a thumbnail* copy of the image for your product. If you'd like to use the same image for the thumbnail, ensure that the checkbox at the top right next to "Use this image for thumbnail" is checked.
*Thumbnail image: The thumbnail image is used to display your product on category pages, RSSfeeds, Home specials and other pages where there will essentially be a listing of multiple products. You can either elect to create your own and specify it as the thumbnail, or otherwise have it resized and designated as the smaller image directly through the Image Manager.
NOTE: The Images tab is only one of several tabs you'll see specified for your product listings. Each tab will have its own unique functionality and parameters that can be configured to your liking.
Step 10. Setting Up Shipping Methods for your Store
No matter what you sell, most likely you will need to ship the order to the customer. Our shopping cart system supports several methods for calculating shipping, including real-time methods via UPS®, FEDEX®, USPS®, Canada Post®, as well as custom methods based on order weight, price, quantity, and even zip code! To review and set up shipping methods:
- Go to Settings Shipping Shipping Methods.
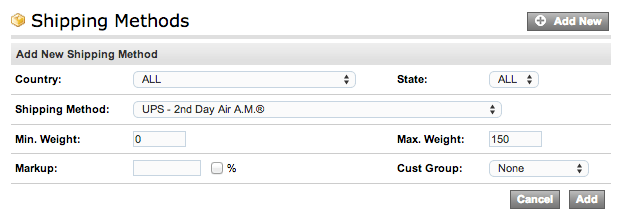
- To add a shipping method, click on the "Add New" button.
- Select the country and state this method will apply to.
- Specify your desired shipping method.
- Add the minimum/maximum weight range the shipping method will work with.
- Add any additional markup you'd like to add to the shipping method.
- Select a customer group this shipping method will apply to. (Default is "none" and will apply to any customer group.)
- Click "Add" to create the shipping method.
Once the shipping method is created, you can set additional parameters, such as exclude countries and/or states, as well as update some of the parameters you've already set.
There are two types of shipping methods available to you:
- Custom methods (flat-rate): With custom shipping methods, you can specify a flat rate or specific percentage used for orders when they match the parameters you specify. These are called custom shipping methods, because they rely on specific settings you configure. For example: shipping based on total order weight, quantity, price, or zip code.
- Real-Time Calculation (via specific carrier): "Real-Time" Calculation methods are specific to common carriers like USPS®, UPS®, etc. These shipping methods will take the various parameters of the order (i.e. shipping weight, size, ship from, and ship to addresses, etc) and calculate a real-time approximation of the cost to ship the items for your customer. As such, these real-time shipping methods will require you to specify the address your items will be shipping from. This can be done via the Real Time Shipping information field in your Shipping Methods screen as shown below.

NOTE: In order to use UPS®, FEDEX®, USPS®, and Canada Post® real-time shipping calculation, you will need to register with the respective carrier first. You can do so by going to Settings Shipping Shipping Settings and registering via the "Enter Credentials" links for each carrier you'd like to sign up with.
Please keep in mind that you do not need to do this if you are going to be setting up manual (flat rate) shipping methods that do not require the real-time calculation.
Step 11. Online Payment Methods
Before your store can be used to purchase products/services it must be set up to take payments for the orders. The most common way of accepting payments online is through the use of a merchant account and payment gateway. If you do not have a merchant account, click here to sign up online.
Accept Credit Cards: Proven to significantly increase sales
A 1stpaygateway credit card Merchant Account and Payment Gateway will increase your sales by providing your customers with the convenience to pay for your products in a safe, reliable, secure manner. 1stpaygateway provides you with the security, service and support you need to sell your products, get paid quickly and grow your business.
Sign up today! Our consultants will provide a boutique level of service and will assist you in achieving desired objectives for your unique business needs. Sign up online or call toll-free at (888) 638-7867.
Set Up Online Payment Methods:
- Go to Settings Payment Online Methods.
- Select the radio button pertaining to which payment methods you'll be accepting, and click Next.
- If you selected 'Accept Credit Cards', select other payment gateway. In the dropdown box, select GoEmerchant XML. If you set up PayPal first, you will need to click Add New, and select GoEmerchant as the Payment Method from the main Online Payment Methods screen.
- Set the Minimum and Maximum value orders can be to use this payment method. The Max value should be the high ticket amount set on your merchant account.
- Select a customer group that this method will apply to. (Default is "none" and will apply to any customer group)
- Click Save. Items 6-10 below will go over setting up your gateway account.
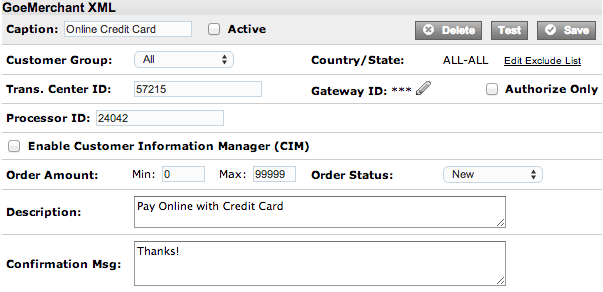
- Type in the Transaction Center ID, Processor ID and Gateway ID from your GoEmerchant gateway account. Please view this article or contact our Support dept if you need help finding this information.(support@goemerchant.com or 888-711-3800)
- Optional: Edit the text in the Caption field. This is the payment method name your customers will see on the Checkout page. For Example: PAY WITH CREDIT CARD - SECURE CHECKOUT
- Optional: Type a description for this payment method. The customer will see this below the payment method name. For Example: Pay securely online - We accept Visa, MasterCard, Discover, and American Express.
- Type in a Confirmation message. This will display to the customer once the purchase has been completed. For Example: Thank you for your business!
- Click Save, then Test. If the integration was successful, you will receive a declined transaction in your payment gateway account.
NOTE: Feel free to contact Support at support@goemerchant.com or (888) 711-3800 if you are having difficulties entering your payment gateway information.
Specify Your Credit Card Types
You will want to specify what type of credit cards your online store accepts. GoEmerchant has already created a default list for you, but you may want to add to or edit the list. To change your credit card types, go to Settings Payment Credit Card Types.
Step 12. Offline Payment Methods
Along with online payment methods, you can also set up offline payment methods for your store. These payment methods are optional and are for situations where you want to accept a check or money order. To set up Offline Payment Methods:
- Go to: Settings Payment Offline Methods
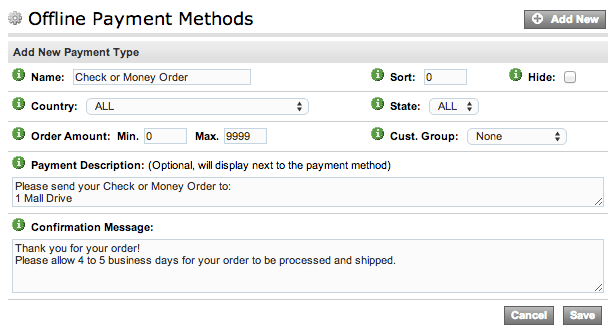
- Click the Add New button
- Enter a Name for your offline payment method in the Name field. (i.e. Money Order). This is what your customers will see on the Checkout page.
- Specify the country and state this offline payment method will be available to.
- Set the Minimum and Maximum value orders can be to use this offline payment method.
- Select a customer group this method will apply to. (Default is "none" and will apply to any customer group)
- Add your description and confirmation messages.
- Click "Save" to create the offline payment method.
Once created, you can further update the offline payment method to require text such as a check number or other specifics you may wish to use.
NOTE: The use of offline payment methods is strictly optional, but can be quite useful when internally testing the various functions of your store since these do not require a live transaction.
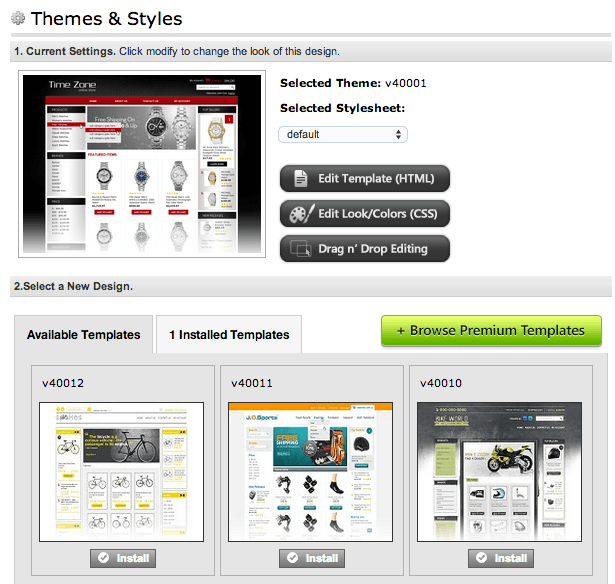
Step 13. Selecting the Look/Feel of your Store
Your GoEmerchant Store comes equipped with over 50 different Themes and Styles to choose from. Furthermore, these themes can be altered by you in various ways to get the exact look and feel you want for your business. To set your store's layout:
- Go to Settings Design Themes & Styles
- Once there, you will see two separate tabs. One tab will display all of the available templates and the second tab will list all of the templates that have been applied (installed) into your Online Store Manager. To select a different template, select the "Available Templates" tab and preview your options.
- Each template will have a preview screen available to give you a general idea of what it will look like. After you are satisfied with your selection, click on "Install" for the template.
- Your new template will be installed, and you will be given the option to actually apply the template to your store. To view your store, simply click on the "View Store" link located on the top navigation bar of your Online Store Manager.
Step 14. Altering the Look/Feel of your store
Aside from selecting different templates, you also have the ability to edit and alter the templates in order to get a specific look. If you have a working knowledge of HTML editing, feel free to view the various templates available to your store. These can be accessed by going to Settings Design Template Editor.
You also have access to edit the Cascading Style Sheets (CSS) file used by your template. This can be accessed by going to Settings Design Themes & Styles and selecting the "Edit Look/Colors (CSS)" button. Another section you can explore is the Titles & Content listing which allows you to edit the header and footer sections of various templates. This section is accessible by going to Settings Design Titles & Content.
NOTE: We have web design services available which can customize these templates to match your company logo, colors, etc. Contact our Support department for more information.
Finally, a new feature introduced in version 3.2 is the Quick Design Bar which is accessible directly from your Online Store Manager when viewing the store. This exciting new featureallows you to edit design elements of your site with a unique "Click and Drag" approach. It also allows you to quickly and easily edit your site content and product information.