1stPayPOS Support
Portal Settings
In the POS Portal, select the Settings tab. Settings allow the merchant to set the tax amount, tips, receipt header, and more.
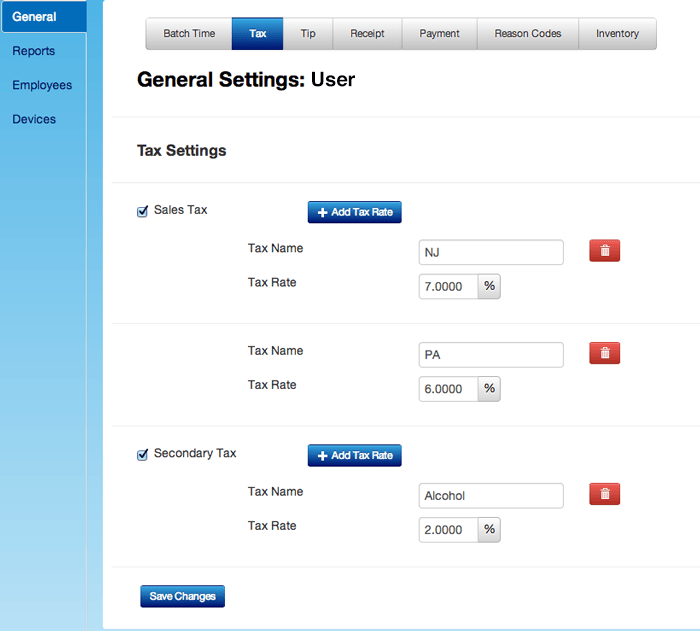
Tax Settings
- Log into your 1stPayPOS Portal. In the top menu, click Settings.
- Select Tax from the submenu.
- Click Add Tax Rate. Two boxes will appear: Tax Name and Tax Rate.
- Enter the Tax Name, this is a required field.
- Enter the Tax Rate, which should be a percentage. For example, entering 7 in the box would apply a 7% tax rate.
- You may set up multiple sales taxes, and also secondary taxes. When completed, click Save Changes.
- To delete a tax rate, click the red trash can button next to the tax you'd like to delete.
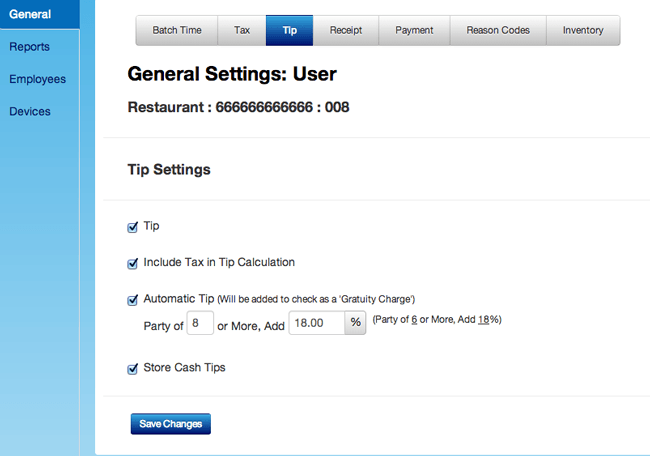
Tip Settings
The merchant can configure tip options here.
- Log into your 1stPayPOS Portal. In the top menu, click Settings.
- Select Tip from the submenu.
- Check the check box next to Tip if you'd like to accept tips.
- Check the check box next to Include Tax in Tip Calculation if you'd like automatic tip calculations to include tax.
- The Automatic Tip option is ideal for restaurants. If enabled, you will have option of setting a minimum party size to automatically apply the tip to, and what the tip percentage automatically applied will be.
- Retail MIDs can set a default Tip Percentage or Tip Prompt to appear on checkout.
- To delete a tax rate, click the red trash can button next to the tax you'd like to delete.
- Store Cash Tips will track cash tips in the system, as well as credit card tips.
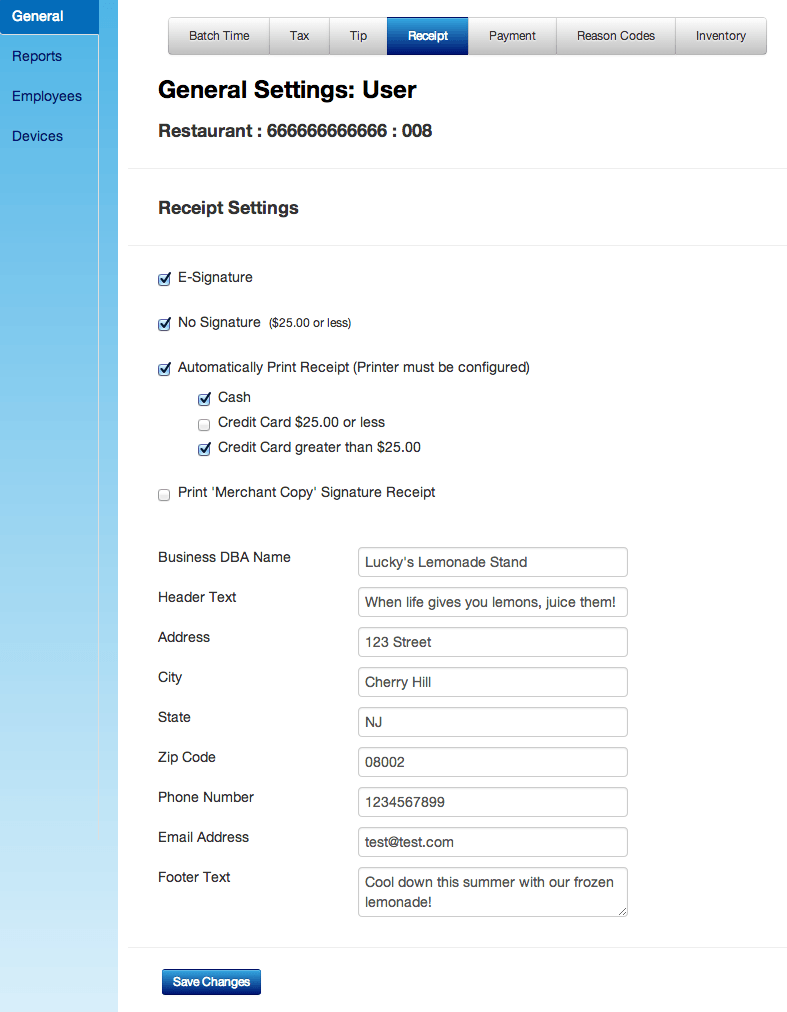
Receipt Settings
Receipt settings allow the merchant to set up the receipt header/footer, e-signature or choose receipt print options.
- Log into your 1stPayPOS Portal. In the top menu, click Settings.
- Select Receipt from the submenu.
- Check the check box next to E-Signature if you'd like to accept e-signatures.
- By checking off the check box next to No Signature ($25.00 or less), signatures will not be required for transactions totaling less than $25.00.
- Check mark the box if you'd like to Automatically Print Receipts after each transaction. Your receipt printer must be configured first to apply this setting.
- If Print Merchant Copy Signature Receipt is enabled, a second receipt will print for credit card transactions, allowing the customer to enter tip on the receipt and return to your business.
- Fill in your Business's information and Header/Footer text. This will all display on printed receipts.
- When finished configuring changes, click Save Changes.
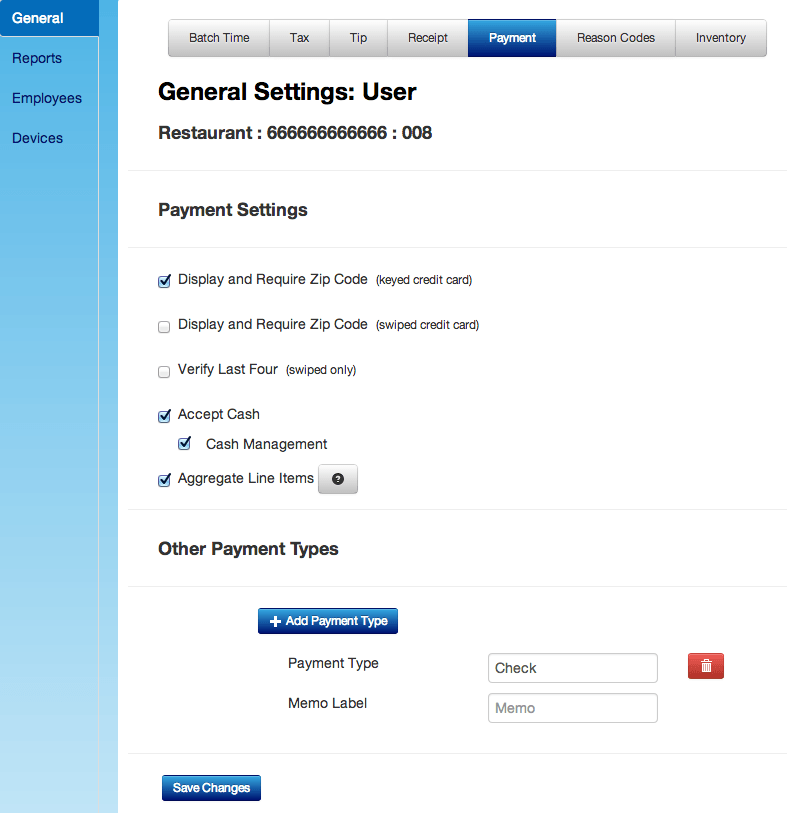
Payment Settings
Receipt settings allow the merchant to set up the receipt header/footer, e-signature or choose receipt print options.
- Log into your 1stPayPOS Portal. In the top menu, click Settings.
- Select Payment from the submenu.
- Check the box if you would like to Display and Require Zip Code for keyed and swiped credit card transactions.
- Check the box next to Verify Last Four if you'd like cashiers to verify the last 4 credit card digits on swiped credit card transactions.
- If you'd like to accept cash, check the box next to Accept Cash. When checked, the option will appear to enable Cash Management. This allows you to track amount of cash in the register, pay ins & pay outs, and more. Read more here.
-
Enable Aggregate Line Items if you'd like items with a quantity greater than 1 to be consolidated on the main screen instead of each item appearing on a separate line. This does not apply to items with modifiers.
Note: We recommend turning this feature OFF if you have Loyalty Program turned ON and you are using the Visits Style with free item rewards, or Free Item Date-Based Rewards.
- Other Payment Types allows you to set up other payment types not supported by 1stPayPOS, such as checks. Payment types added here are only stored in the app for reporting purposes, and are not processed with electronic services. The app simply tracks purchases to help the merchant reconcile.
- When finished configuring, click Save Changes.
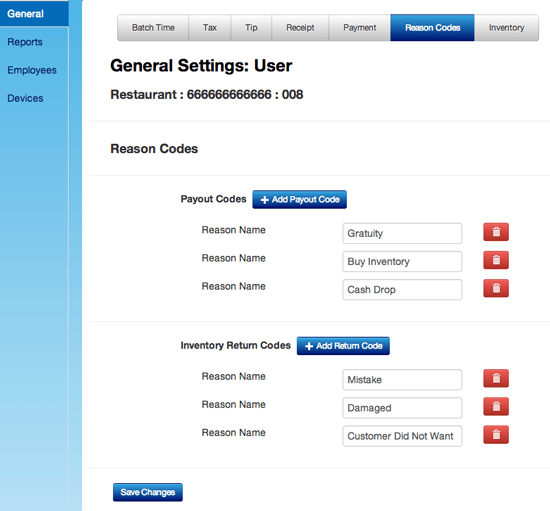
Reason Codes
Reason Codes is where the merchant sets up their Payout Codes (reasons why money is taken from the register) and Inventory Return Codes (reasons for returns).
- Log into your 1stPayPOS Portal. In the top menu, click Settings.
- Select Reason Codes from the submenu.
- To add a Payout Code, click Add Payout Code.
- In the box that appears, enter the name of the Payout Code Reason. Add as many as needed.
- In the Inventory Return Codes section, click Add Return Code to create a Return Reason Code.
- In the box that appears, enter the name of the Inventory Return Reason. Add as many as needed.
- When finished configuring, click Save Changes.
Inventory Management
The Inventory Button under Settings is for Inventory Management. It allows the merchant to set up reorder alerts. An alert can be sent via email or text. The merchant can set a reorder count for each item in the inventory section. To read more about this, click here.
Devices
The Devices screen shows all iPads used for the merchant?s account. The merchant is allowed one login or session at a time unless they signed up for more.
- Log into your 1stPayPOS Portal. In the top menu, click Settings.
- Select Devices from the left-hand menu, and Devices from the submenu.
- A list will appear with all of the devices used for the account.
- Devices can be enabled or disabled by checking off the Enabled check box next to each device.
- To delete a device, click the Red trash can button next to the device you'd like to delete.
- When finished configuring, click Save Changes.
Tip 1: If the merchant tries to log into another device while logged in elsewhere, they will get a simultaneous login error.
Tip 2: Deleting sessions will log that user out.

Printers
The Printers screen allows the merchant to assign a name to the receipt printer and kitchen printer. This can be useful if there are multiple printers, such as a bar printer, kitchen printer, and server station printer.
- Log into your 1stPayPOS Portal. In the top menu, click Settings.
- Select Devices from the left-hand menu, and Printers from the submenu.
- Click Add Printer.
- Type in the desired name for the printers, then choose the printer type:
- Receipt: The printer that prints out the customer receipt and signed copy. Will include item prices.
- Items: Items is for printers that will print in the kitchen or at the bar. Will include item names and modifiers, and will not include prices.
- To delete a device, click the Red trash can button next to the device you'd like to delete.
- When finished configuring, click Save Changes.
